


The good thing about artificial intelligence is that, to some extent, it can be more or less done on a device you already have. And although companies like Samsung allocate a significant portion presentation of it flagships With AI features like a photo editor, these software features are sure to be available on other lower-end Samsung phones as well.
The same thing is happening with Google Photos, Google’s popular gallery and photo manager, which is starting to release several AI-powered editing features like Magic Eraser, which until recently was a Pixel 8 exclusive feature, but now I have a humble iPhone SE 2020 of the year.
In this guide, we’ll show you how to use some of Google Photos’ AI features, such as Magic Eraser, the sky changer, or the blur effect feature.
Google Photos Magic Eraser: how to use it?
This feature essentially removes unwanted elements from a photo. We are not sure what will he ever make a meme (but that’s what
To use it, select the image you want to edit and select the option Edit. Then go to Tools and choose magic eraser. If Google Photos notices obvious items that need to be removed, such as a person sneaking into a couple’s selfie, it will suggest it automatically, but if it doesn’t, you’ll have to select the items you want to remove as if you had highlighted them. their.
Don’t be afraid to remove important parts of your photo because eventually Google Photos’ AI will understand that you meant to remove part of the intruding element and not the focal point of the photo.
Once you’ve finished coloring in the elements you’re removing, look at the results. If you don’t like it, keep washing until you get the desired effect.
How to Change the Sky in a Photo Using Google Photos
This option allows you to change the sky in your photo. To change it, select an image that has a sky (it won’t appear if there isn’t one) and select the option Edit, Tools and choose Cute.
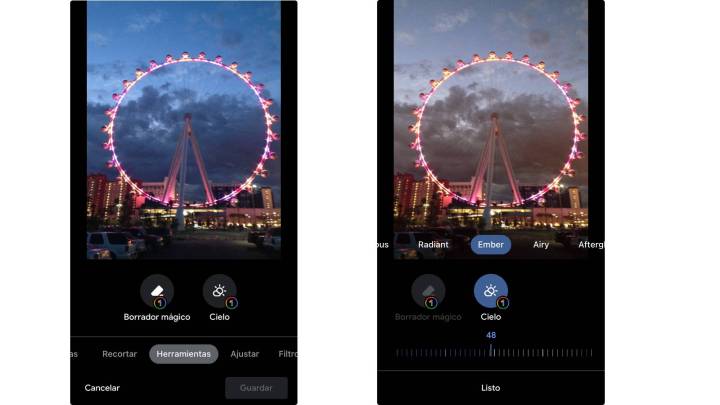
You will immediately see different filters, such as glowing or shining. Below you will see a scale from 0 to 100, allowing you to change the intensity of the filter.
How to Blur a Photo Using Google Photos
Using this option adds a bokeh effect to your photos. To use it, just select the option Edit, Tools and choose Blur. In automatic mode, you will see a gradation from 0 to 100 to perform the blur.
Use features to unlock automatic offers
Once you start using these features, Google Photos will know which features you use most often, so once you select the option Edit In a photo, you’ll see suggestions like blurring to add a bokeh effect or changing the tone of the sky.
We suggest you take some photos and start experimenting with the effects. Just remember that these AI editing features are only available to Google One subscribers (pay for more Google Drive space).
However, if you are not a subscriber, you can edit 10 images per month. The idea is obviously to convince you to pay for a Google One subscription.
Source: Digital Trends


: Everything we know a week after its release")


