


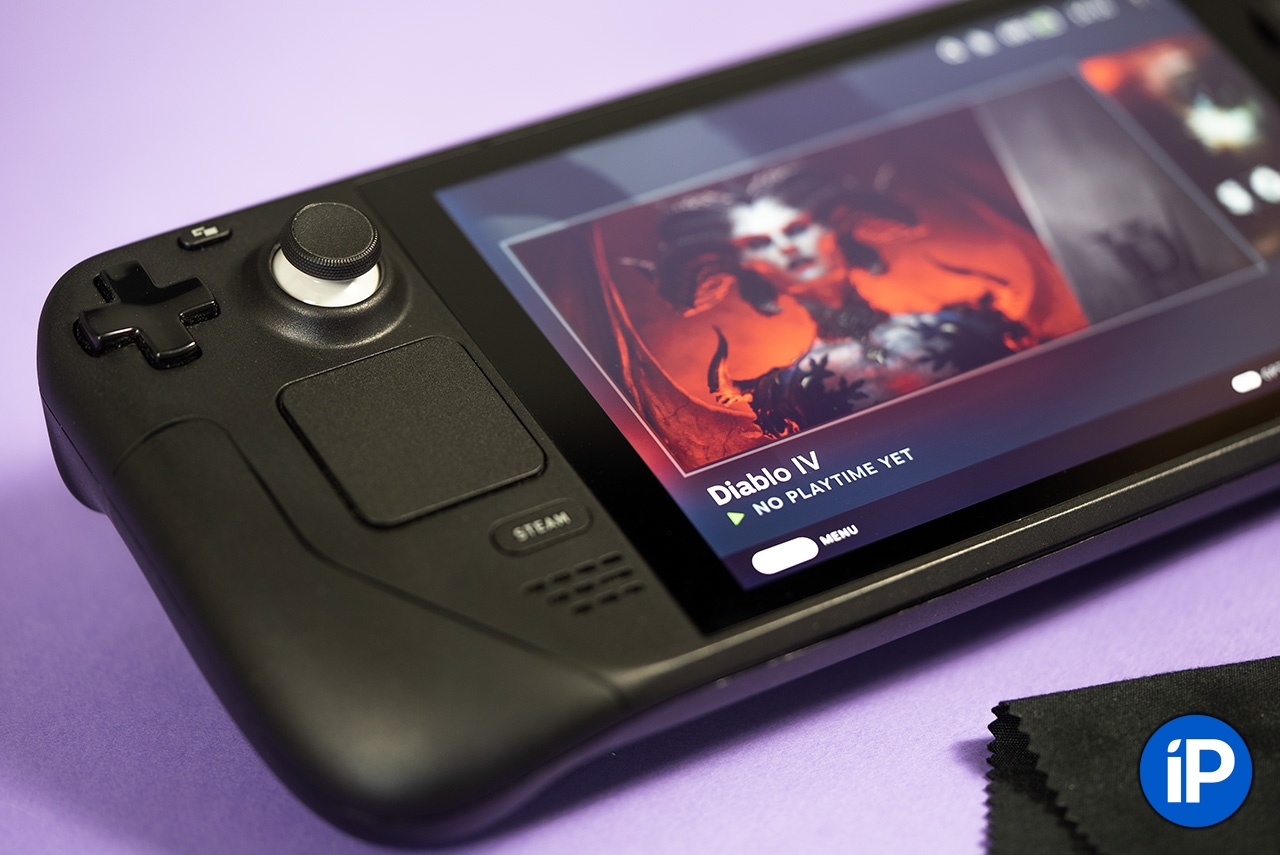
A full-fledged gaming computer in portable console format. Isn’t that what many people were talking about a few years ago? In 2022, Valve released a gamer’s dream device called the Steam Deck, which looked like a larger copy of the Nintendo Switch, but constantly booted up and played in almost all the games from the expanded Steam arsenal.
And now it’s 2023, and I haven’t let go of my steam deck for several months now, alternately sticking to the fourth diablo and the new Baldur’s Gate. Soon this list will be added to Starfield, new (but already a cult) the creation of the studio Bethesda. Yes, yes, steamdeck easily digests all fresh AAA titles.
I already wrote a review and impressions after a month of owning Steam Deck:
👉 The most hype console in the world! Review of Steam Deck in Russia, is it worth taking
👉 I’ve been playing on Steam Deck for a month. Is this console worth buying in 2023
In the same material, I will tell what to do first of all with what was written by the “steam deck”, how to set it up correctly, how and what tweaks to install and other most useful factswhat all owners of this amazing handheld console need to know.
Let’s imagine that you have unpacked your new Steam Deck. Here’s what you need to do with it right out of the box:
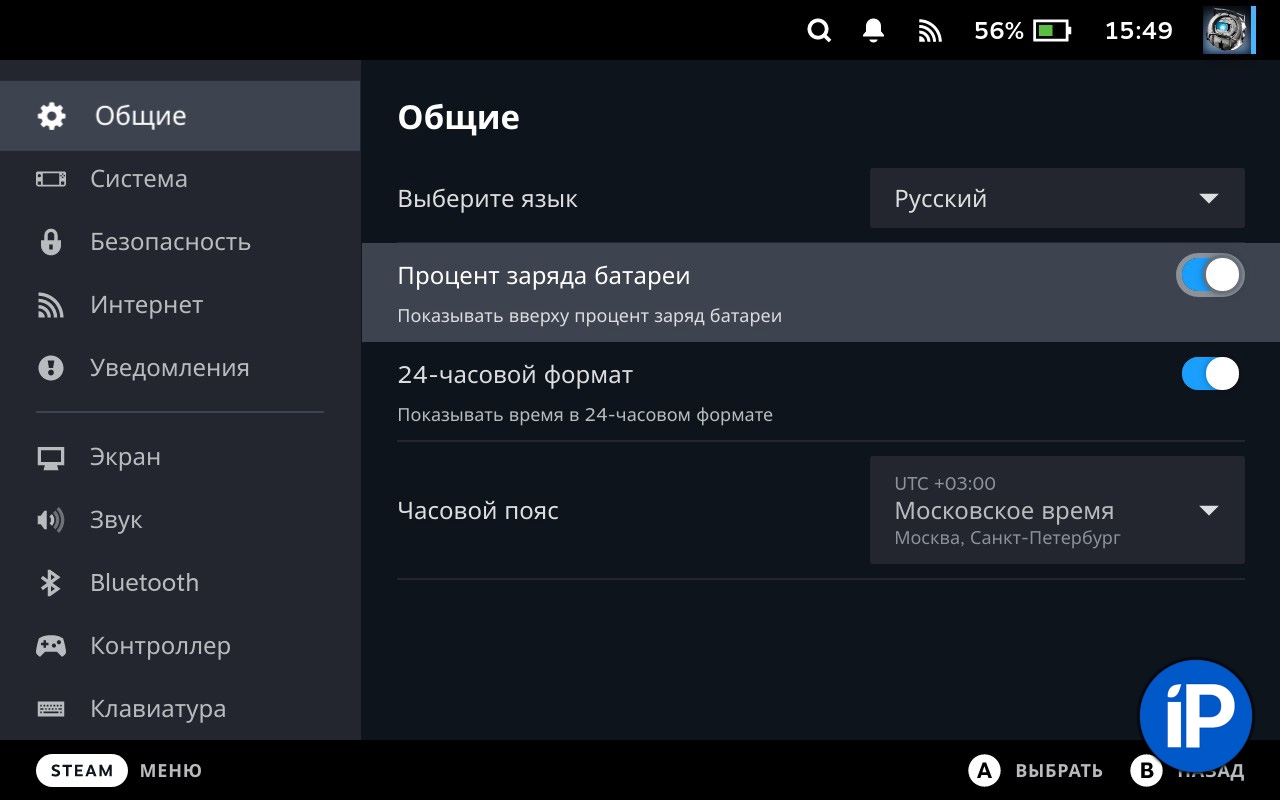
Basic Steam Deck settings in game mode. Check list
1. After activating the console, you need to click the “Steam” button and go to Settings – General. Here you should activate the display of the battery charge in percent and the display of time in 24-hour format.
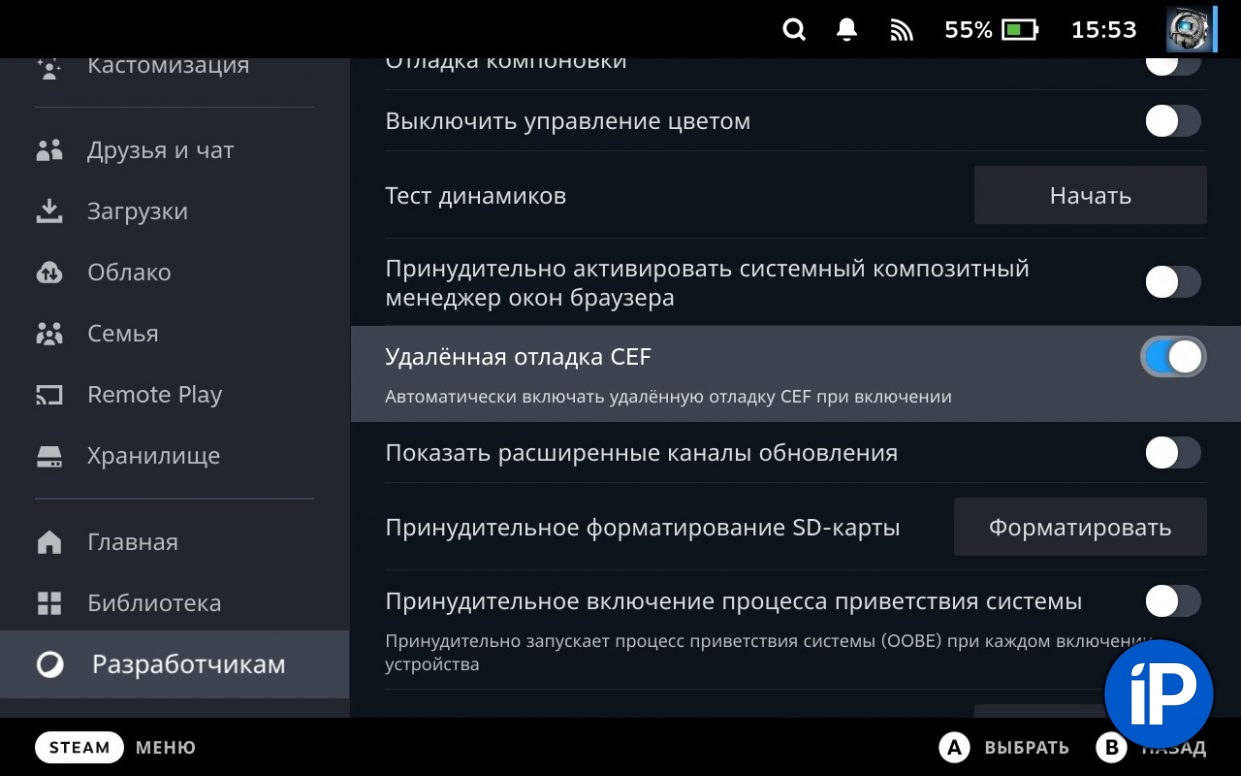
2. Go to the “System” section, go there and activate the “Developer Mode”. After that, the “To Developers” item appears in the main menu at the very bottom. In it, activate “Remote Debugging CEF”.
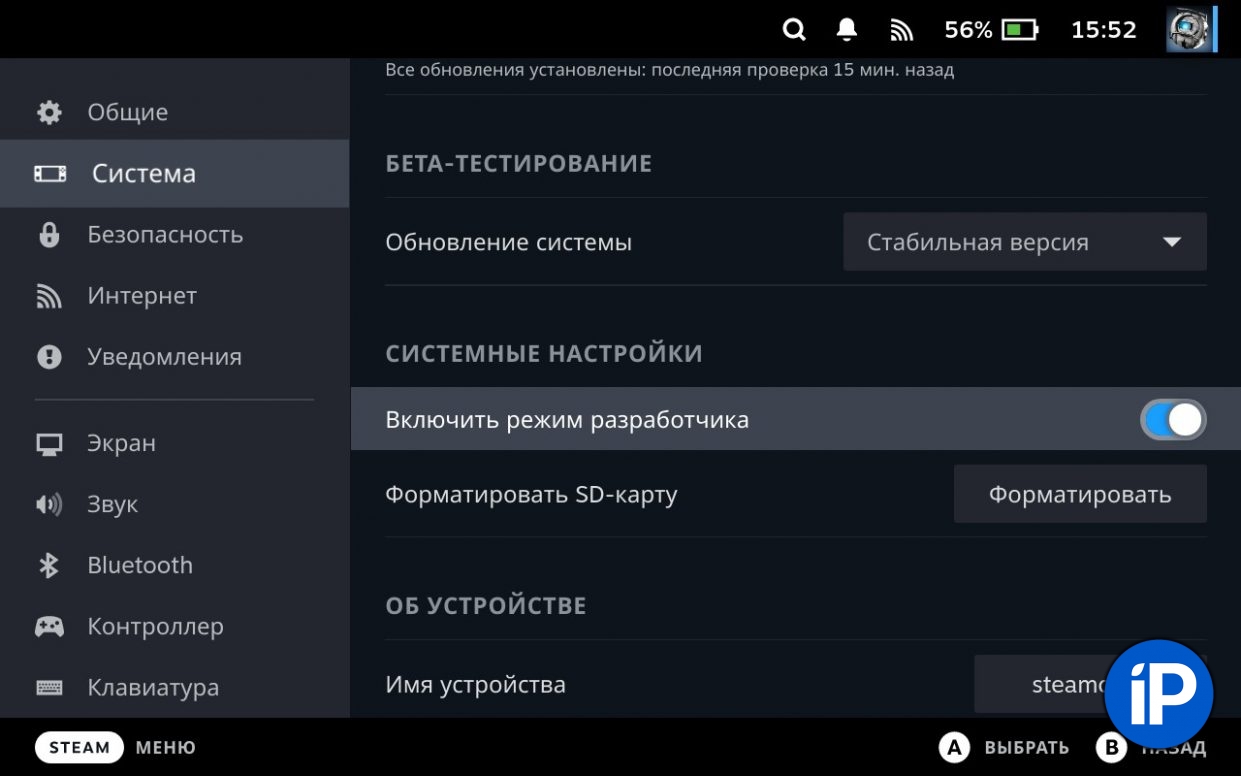
This is necessary for the work of various plugins, which you will definitely stay in the future and experiment with the console and its capabilities.
After activating “CEF Remote Debugging”, press the Steam Deck power button at the top of the device and reboot the device using the menu that appears.
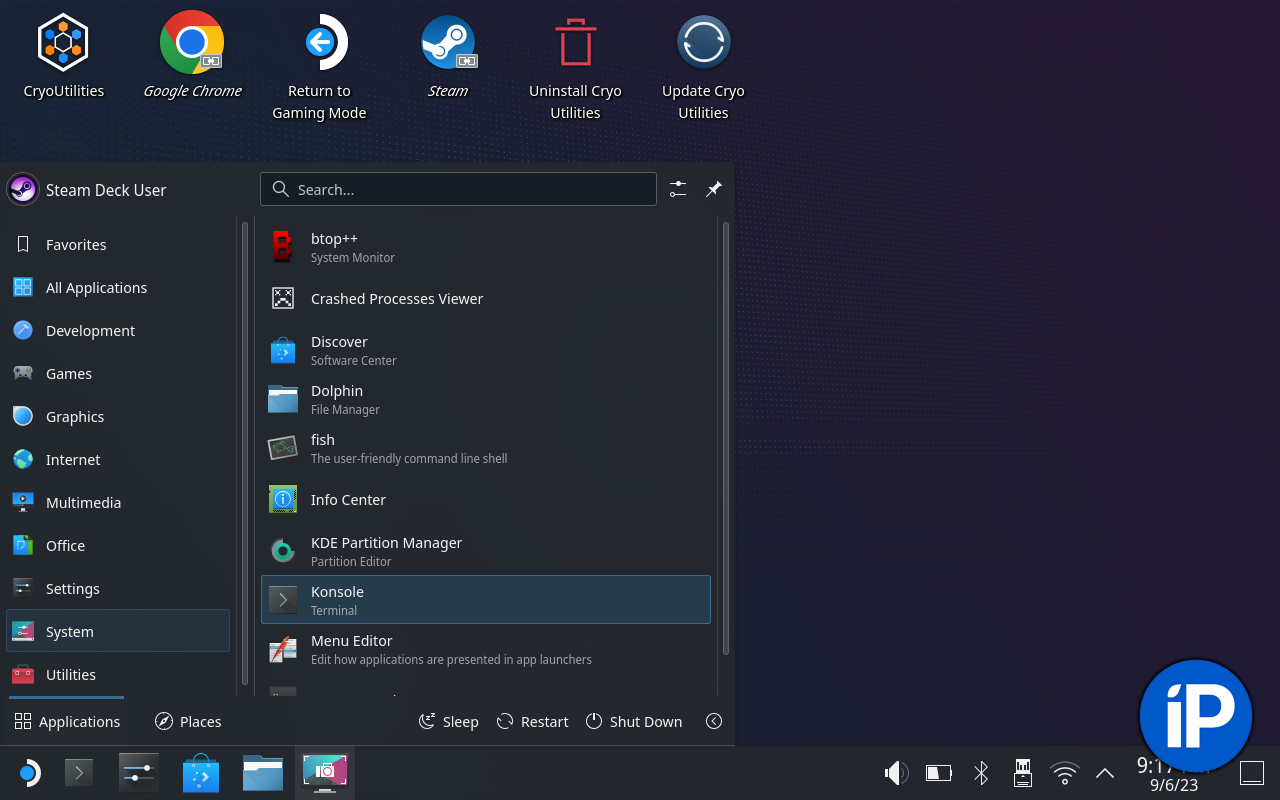
Preparatory work in Game Mode consoles are finished. Go to desktop mode.
Basic Steam Deck settings in desktop desktop mode. Check list
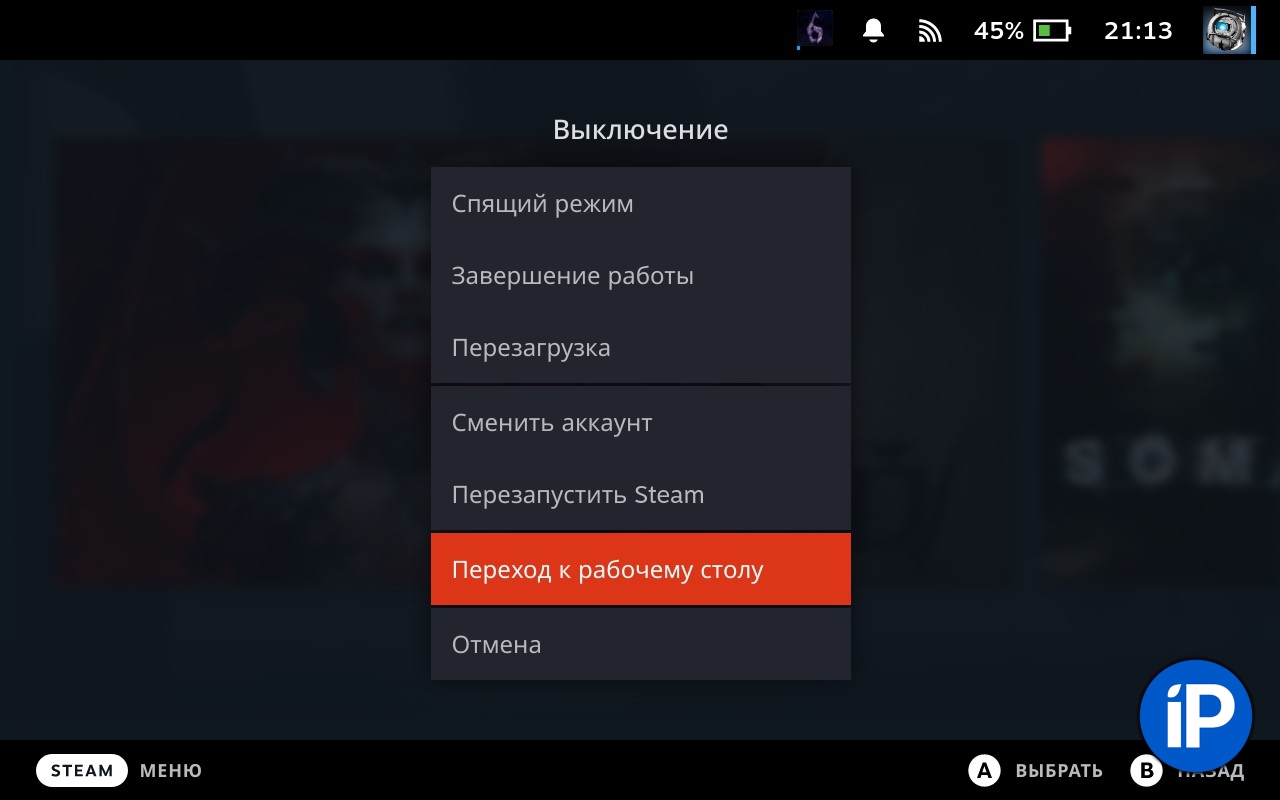
To switch to desktop mode, press the power button on the console on the top of the device and select “Go to Desktop” from the menu that appears.
It is important to understand that in desktop mode, it is best to work with a connected keyboard and mouse. To do this, you will need, in fact, any wired keyboard with a wired mouse and a hub for several USB ports connected to the device via USB-C.
I have the original Steam Dock, but you can use any other, here are links to some:
▪️A simple hub for 692 rubles.
▪️ A more expensive hub with HDMI for 1698 rubles.
▪️Docking station for Steam Deck 6 in 1 for 2103 rubles
▪️ Another smaller docking station for 2623 rubles.
If you don’t want to wait for delivery from China, just go to the nearest electronics store – you will surely find an analogue a little more expensive, so you don’t need to wait.
So, the keyboard and mouse are connected to the Steam Deck via a USB hub, we continue the transition.
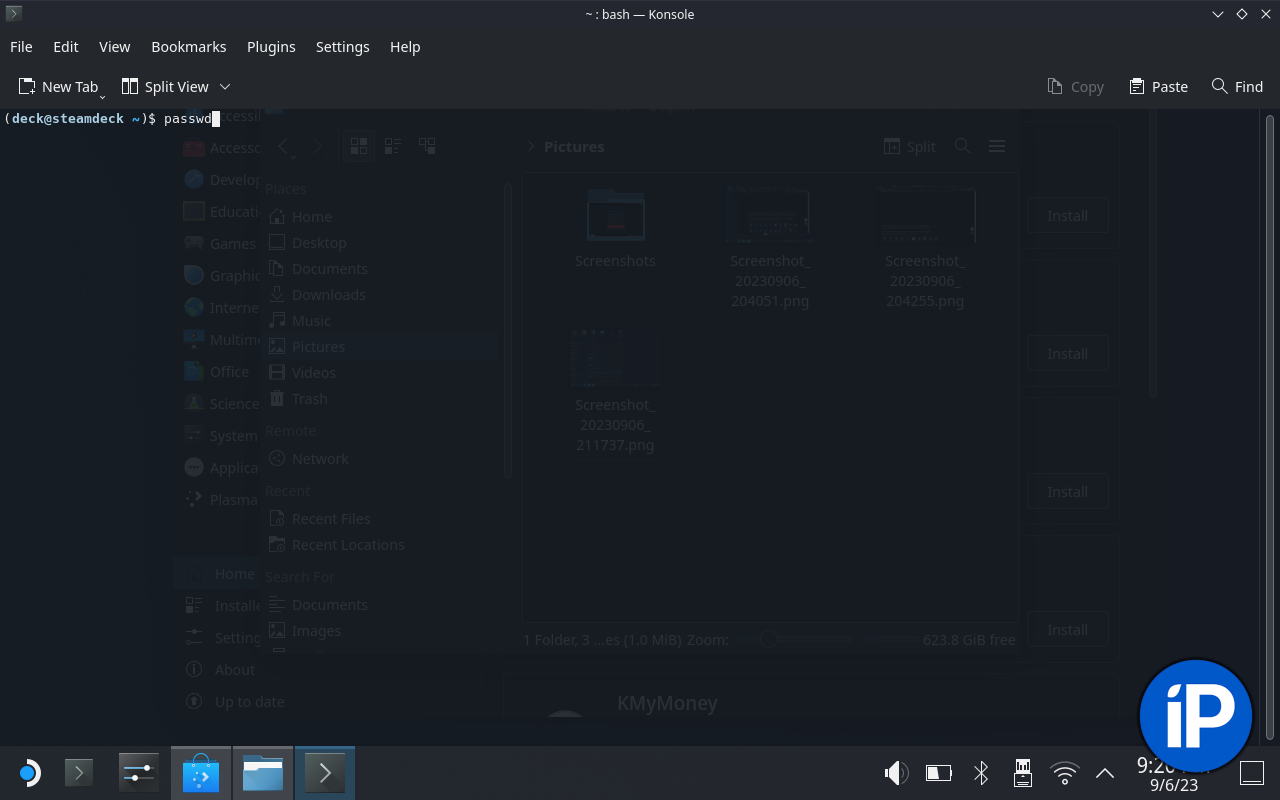
1. Click on the similar “Start” button on the remote control and in the menu that appears in the “System” category, select and launch the console.
2. Set a superuser password, because you will definitely need it during the installation of various programs.
Write in the console line password and press Enter. Enter the newly created password (it will not be visible in the console line), press Enter and enter this password again to confirm. If the line “Password updated successfully” appears, then you did everything right.
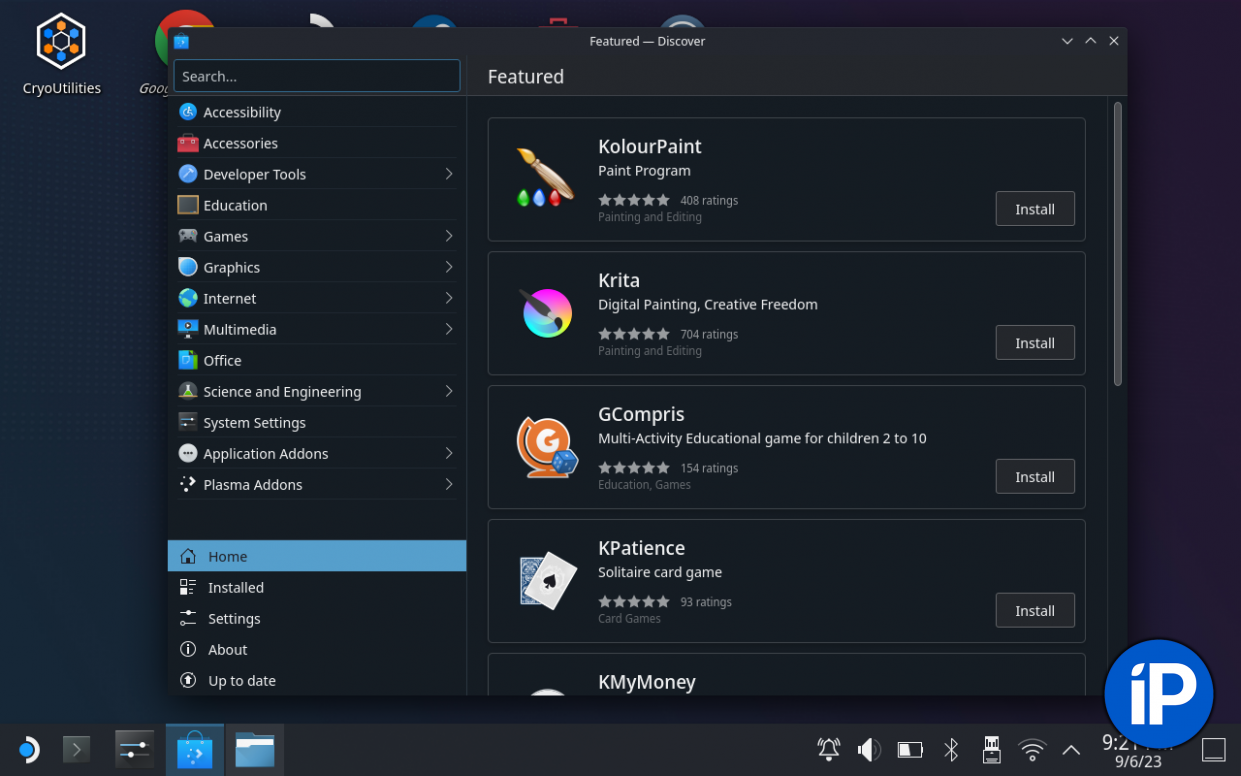
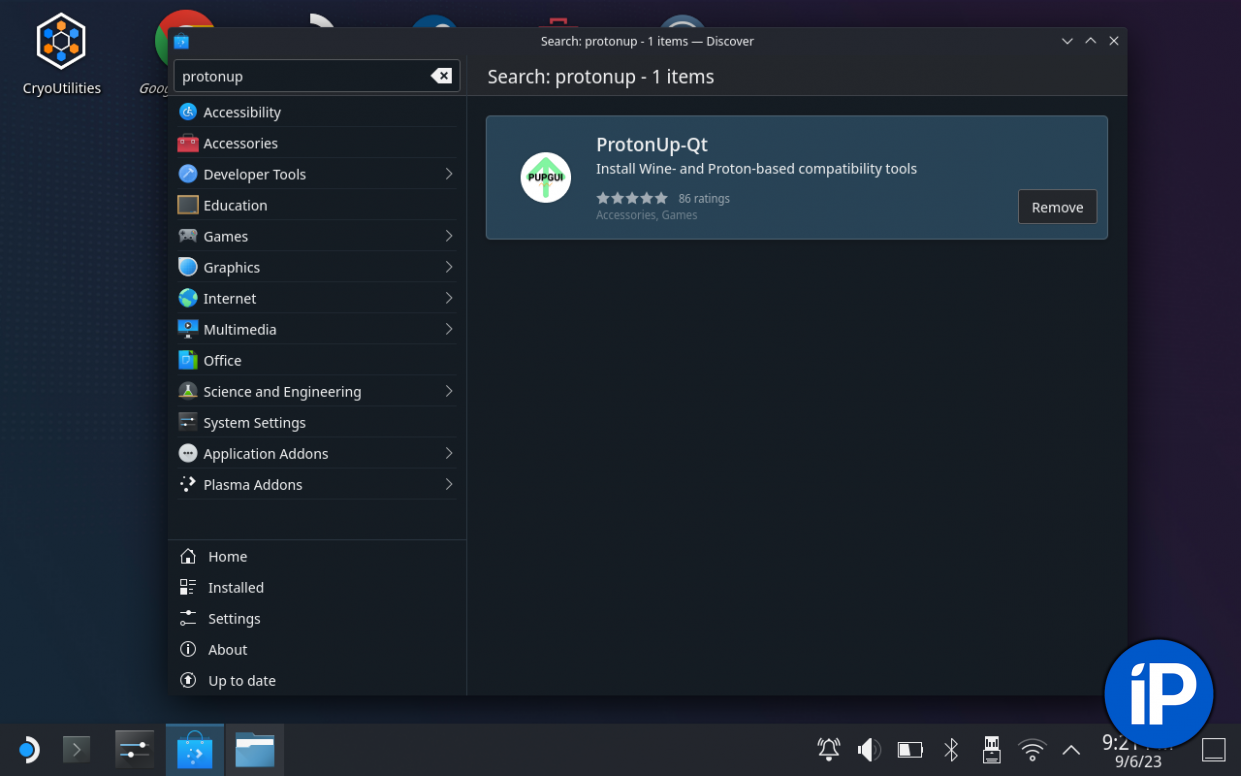
3. Open the Dolphin Application Manager and type Protonup-qt in the search bar. This is a pack of codecs that the console lacks in order to run games smoothly. Without them, for example, I did not want to run NFS Unbound, just a black screen.
After installing Protonup-qt, go to this application in the drop-down similar start menu and run it. In the window that appears, select the entire version of Proton and click “Add Version”.
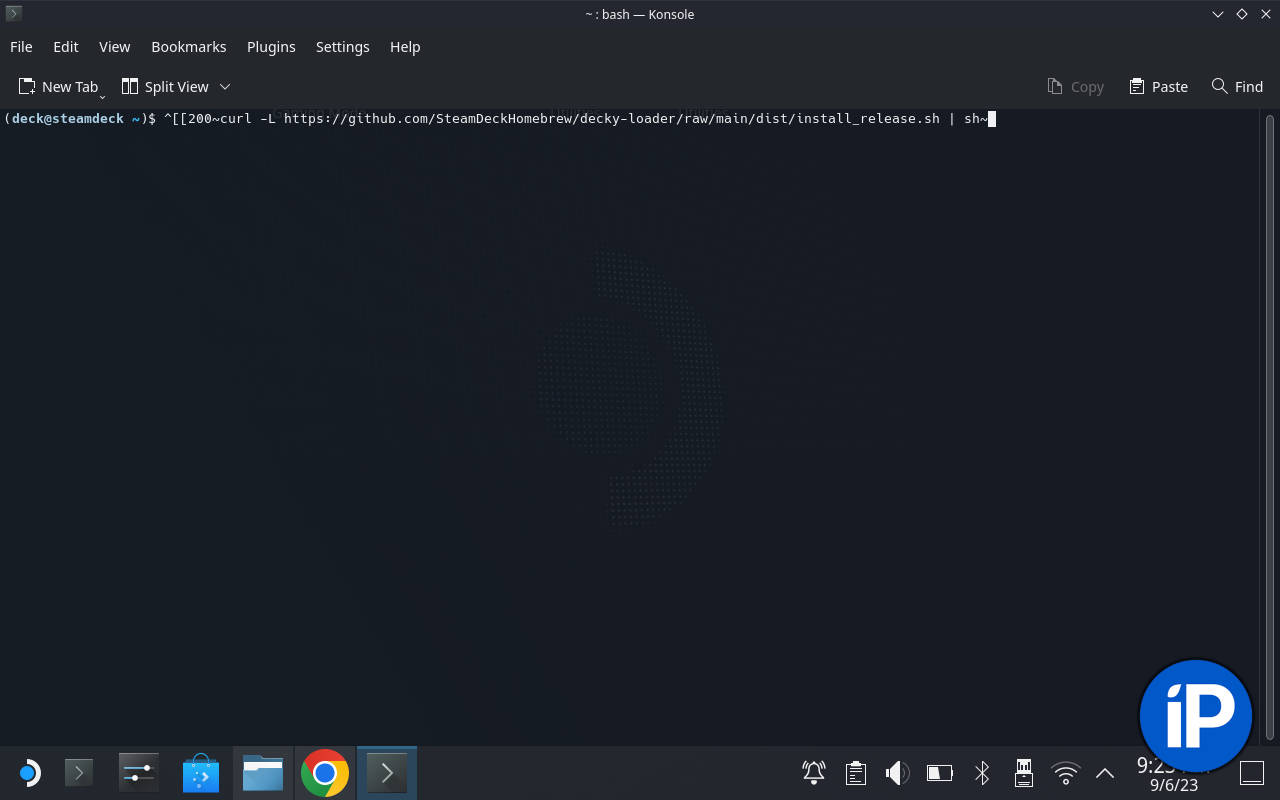
4. Install the Decky Loader plugin manager. To do this, copy and paste this command into the console text: curl -L https://github.com/SteamDeckHomebrew/decky-loader/raw/main/dist/install_release.sh | w.
During the installation of the console, ask you to enter the superuser password that we set in the first project.
After installation, you can close the console and switch from desktop mode to gaming mode by repeatedly clicking on the return to gaming mode icon on the desktop.
In game mode, click on the button with three dots to the right of the device screen and select the electric plug icon in the menu that appears – this is the Decky Loader. Highlight the store icon and press the “A” button to open free plugin resources.
The minimum list of plugins that are recommended to be installed
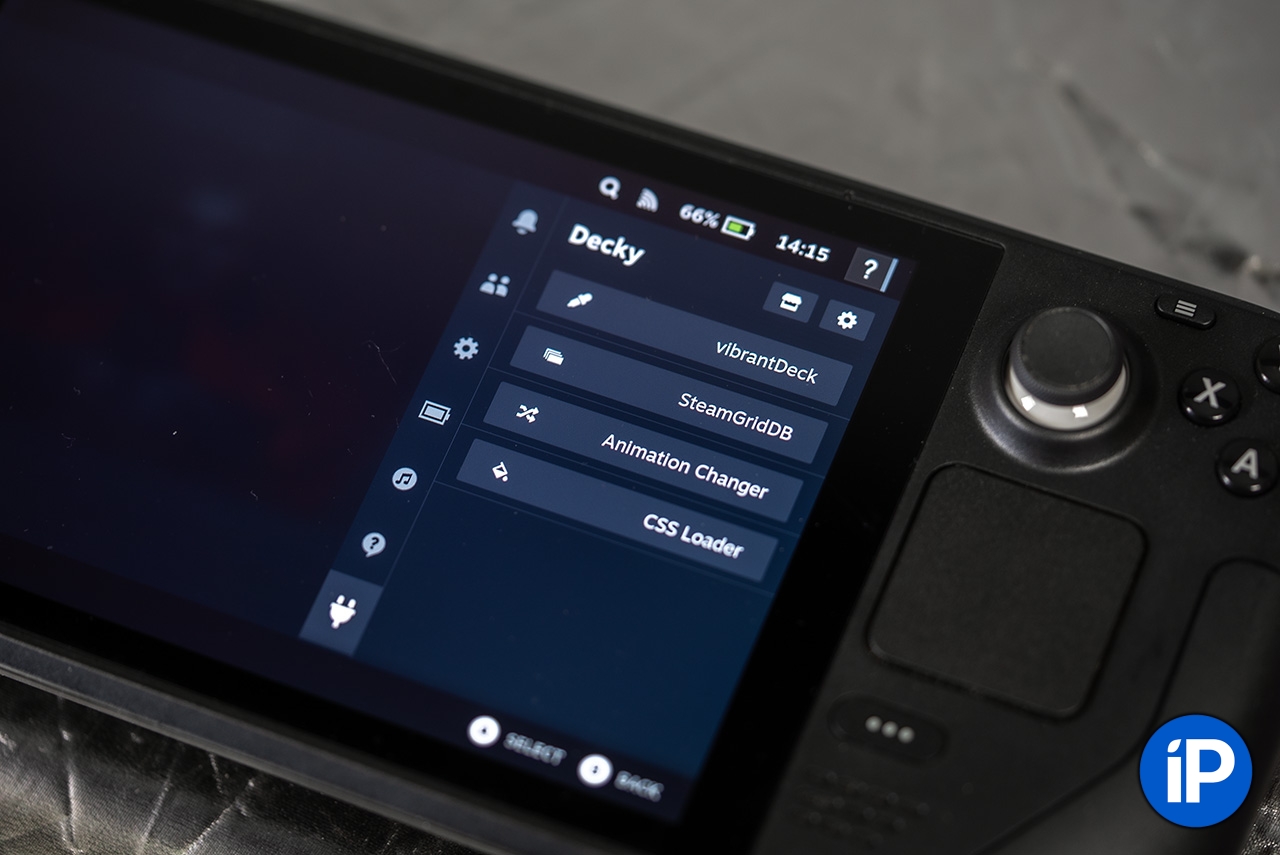
1. bright deck – image enhancement plugin.
After installing this plugin, go into it and increase the Saturation parameter to 125 points to make the picture more saturated. The eyes will be pleased.
2. Animation changer – Plugin for changing the boot screen when you turn on or after rebooting the device.
Valve offers alternative animation options for points, which are given after the purchase of games. On the contrary, in the Animation Changer database you can find dozens of different animations for every taste for free.
I installed this bootloader. Well, isn’t it lovely? (old people will understand)
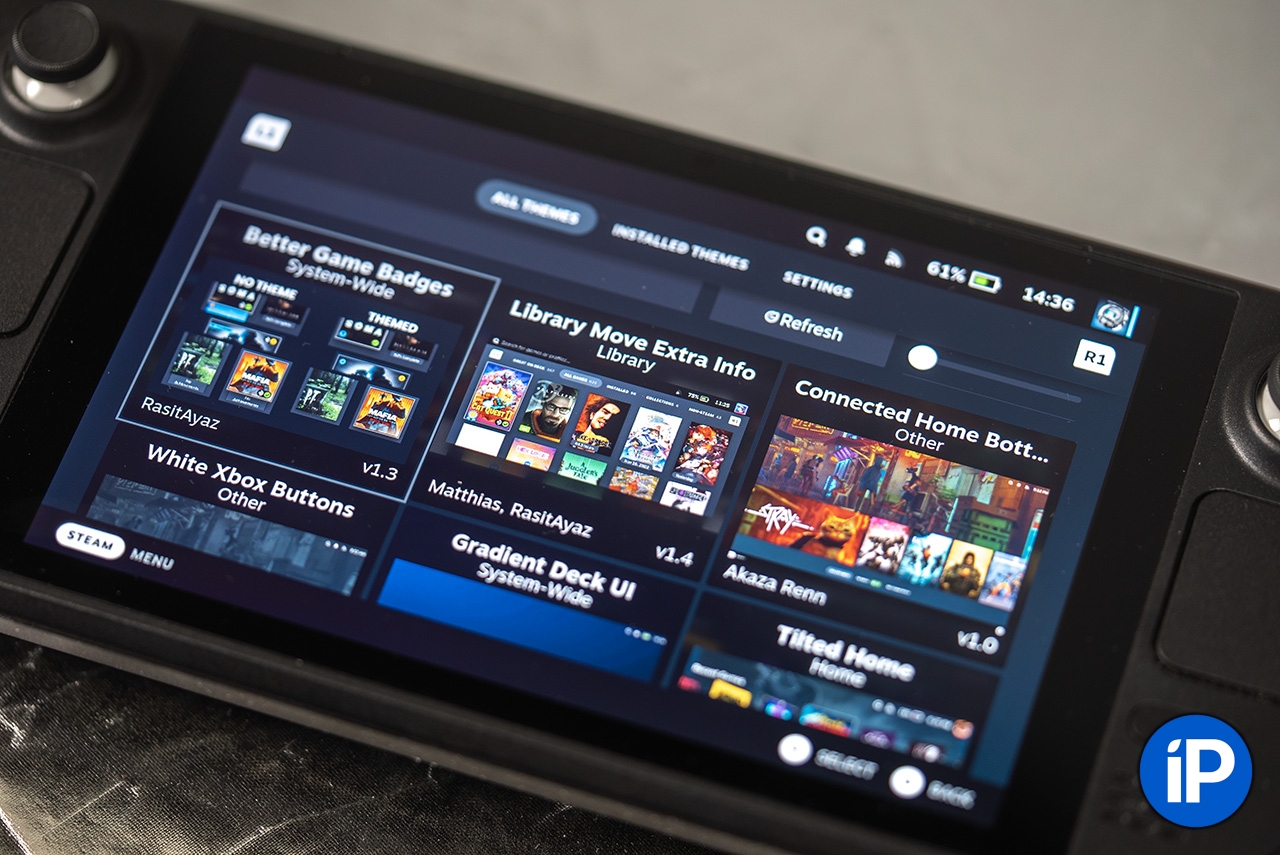
3. CSS Loader – plugin for changing the design of the main screen.
The default Steam Deck home screen has too much redundant information in my opinion. Using CSS Loader, you can download and apply alternative themes, so that the main screen will look like the one on the PlayStation 5 or the laconic Nintendo Switch.
In addition, you can adjust the transparency, change the colors of the menus and other visual parameters of the operating room.
All theme skins are also free and work great with no lags or dependencies.
4. SteamGridDB – plugin for changing the covers of standard games.
The database contains hundreds of pictures posted by the gamer community, including animated versions.
If you don’t like the stock cover, replace any installed game, with SteamGridDB you can make it prettier to your liking.
This completes the preparation for using the Steam Deck. You can break into your Steam game content and download whatever your heart desires.
How to embed a new SSD on a more capacious one. Which one to take
Personally, I stocked a 256 GB hard drive on my Steam Deck. I am sincerely convinced that this volume, together with a 512 GB flash drive, will be more than enough for me.
But a month later, when the main memory was already filled with Diablo IV and Baldur’s Gate III, and Just Cause 3 and Saint’s Raw 4 were waiting on the flash drive, there was no longer enough space for Starfield. So a strong-willed decision was made to replace the native SSD with an analogue with a capacity of 1 TB.
You can do this on your own, or you can turn to the master, who is completely on her Avito. If you decide to upgrade yourself, we recommend purchasing one of these SSDs:
▪️WD SN740 1TB M.2 NVMe 2230 PCIe4.0x4 for 6396 rubles
▪️Samsung PM991a 1TB SSD M.2 2230, PCIe 3.0×4 NVME for 5839 rubles
I chose Samsung, simply because I wrote a lot of good reviews about this particular SSD.
The replacement itself is quite simple: you need to unscrew 8 screws on the back cover of the steam deck, pry it off a plastic pick or a bank card, then unscrew the two screws that press the cooling plate and pry it off using our slot into which your drive is inserted.
You take it and put in a new one. Perform all steps in reverse order.
The main problem after that is to roll the SteamOS operating system onto a fresh SSD. To be honest, I don’t have a Windows PC, which is necessary to create a bootable USB flash drive, so I used the services of one of the Avito wizards and in 15 minutes I got a working Steam Deck with a clean operating system, paying 900 rubles for the procedure.
Some More Bonus Tips for Steam Deck Owners
✔️ You can always bring up the on-screen keyboard by pressing the “Steam+X” toggle button to type something in chat or if you don’t want to connect a full keyboard.
✔️ In desktop mode, everything is in English by default. There are guides on the Internet on how to change it to Russian, but do not do this – you may experience problems when installing applications and games.
✔️ While loading the game, do not put the console into playback mode, it cannot resume files in this state. It is better to connect it to the outlet and leave it for a while: the screen will dim and will not wake up, and the games will be downloaded and installed without problems.
✔️ On the way Settings – System – Advanced you can deactivate the item “Updated fan control”. After that, the console will make more noise, but it will warm up less. This will come in handy if you intend to spend many hours of gaming sessions.
✔️ For most games, 40FPS/Hz is a common setting. It can be launched after starting the game using the buttons with dots to the right of the screen. At higher values, the deck heats up more and drains faster.
____________________________
That’s all, you are ready for adventure and conquer new titles. If you wish, you can install the GOG and Epic Games Store stores to take games in any country. To do this, you just need to go to the work mode table and find the Heroic Games Launcher application in the Dolphin manager.
In it, enter the logins and passwords from the stores and get access to the libraries of your games, if you have them there.
I hope this guide will help all newcomers who have just bought or are about to buy an amazing Steam Deck portable console that allows you to play PC games anytime, anywhere.
📸 All photos in the article:
Source: Iphones RU
I am a professional journalist and content creator with extensive experience writing for news websites. I currently work as an author at Gadget Onus, where I specialize in covering hot news topics. My written pieces have been published on some of the biggest media outlets around the world, including The Guardian and BBC News.

: Everything we know a week after its release")


