


THE Microsoft Word is the world’s most used text editor. With it you can create anything from simple pages to more complex projects such as books or academic works. It also has a wide range of tools that allow you to add graphic elements such as horizontal lines.
With these it is possible, for example, to make marks to indicate elements in the text or even to underline words or sentences to be emphasized while reading. All this in a few clicks and in different ways.
And today we at TecMundo teach you how to add lines in Microsoft Word. Read on to learn more!
How to add a horizontal line in Word?
1. Open Microsoft Word on your PC or access the browser version in Office Online;
2. Then open the document where you want to add the horizontal line or create a new empty line;
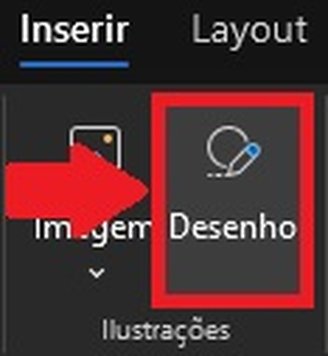
3. Once you get to the main editing page, click on the “Add” option at the top of the screen as shown in the image below;
4. Then click on the “Drawing” icon
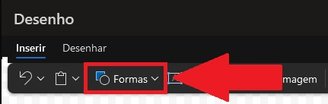
5. Click on the “Shapes” option on the screen that opens;
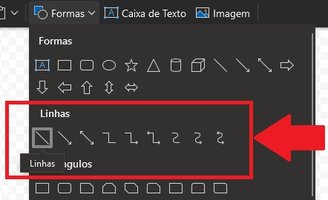
6. Now scroll down and click on one of the options under “Lines”;
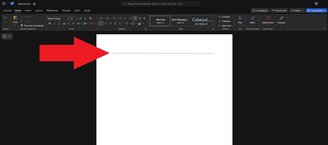
7. Then define the length and direction of the line using the mouse on the editing screen;

8. After creating your line, click the “Save and Close” button to send it to the edited text;

9. Once you have imported your text, you can also make changes to it, such as changing the size, color, and position of the text on the page;
10. Okay, now use this however you want in the text.
How to add a line in Word using the “Underline” or Underline key?
1. Launch Word on your device;
2. Then create a new document or open an existing document to which you want to add a line;
3. Once there, press the “Underline” or “Underline” key. It is important to note that its location varies depending on the type and layout of the keyboard, but the symbol that identifies it is always the same ” _ “;

4. Press together with the “Shift” key and continue pressing until the line of the desired size is formed;

5. Ok, now repeat the process as many times as you want.
How to add a line under a letter or word in Word?
1. Select the word, sentence or letter that should be underlined in the document where the line will be inserted;

2. Then click on the underline button as shown in the image below;

3. That’s it, everything selected will be underlined automatically.

What do you think of the tutorial? Check out TecMundo for more articles like this. Take the opportunity to read how to insert letterhead into Word. Until next time!
Take courses on Udemy
he wants Learn more about the Word toolOr even want to improve your skills with the Office suite? So don’t waste your time and learn whatever you want by taking advantage of Udemy’s variety of courses and teachers. Click and enjoy!
Source: Tec Mundo
I am a passionate and hardworking journalist with an eye for detail. I specialize in the field of news reporting, and have been writing for Gadget Onus, a renowned online news site, since 2019. As the author of their Hot News section, I’m proud to be at the forefront of today’s headlines and current affairs.
: Everything we know a week after its release")


