


make sure your computer Windows 11 This is something you want to protect as much as possible. It is worrying that the functioning of the operating system may not be sufficient, except for possible hacker attacks. The best way to prevent this is restore points avoiding problems and getting it automatically is possible and very simple as we will tell you.
To achieve this, simply activate the tool included in Windows 11 itself, so you do not have to install anything. This is always positive as you avoid using unofficial options that could compromise the operation of the computer (both desktop and laptop). What you need to do is to enable this possibility in one of the following. internal disks you have. In this way, you can be much calmer because you will not have any problems.
Achieved with this tool
Well, something as simple as it is important, for example a restore point When the Microsoft operating system detects a major change, such as installing the Windows 11 update, or even major changes to commonly used applications. However, you should know that yes, it will not always do this as it is not necessary in most cases.
In addition, it does not affect storage, because gradually, while creating a new restore point, it eliminates the old ones so that control of what these files occupy is not excessive. I mean all advantage.
Turn on Windows 11 protection on the drives you are using
The steps are very simple and insuranceso you shouldn’t be afraid to make a change that could compromise the integrity of Windows 11. working because the team will be fully the same that we propose to you before making the change. Next:
- Go to the desktop of the computer and press the Windows + I buttons together.
- On the left, select System and once inside, look for Information. Access this section and click on the link located in the upper area called system protection. A window opens allowing you to access the tool for discs.
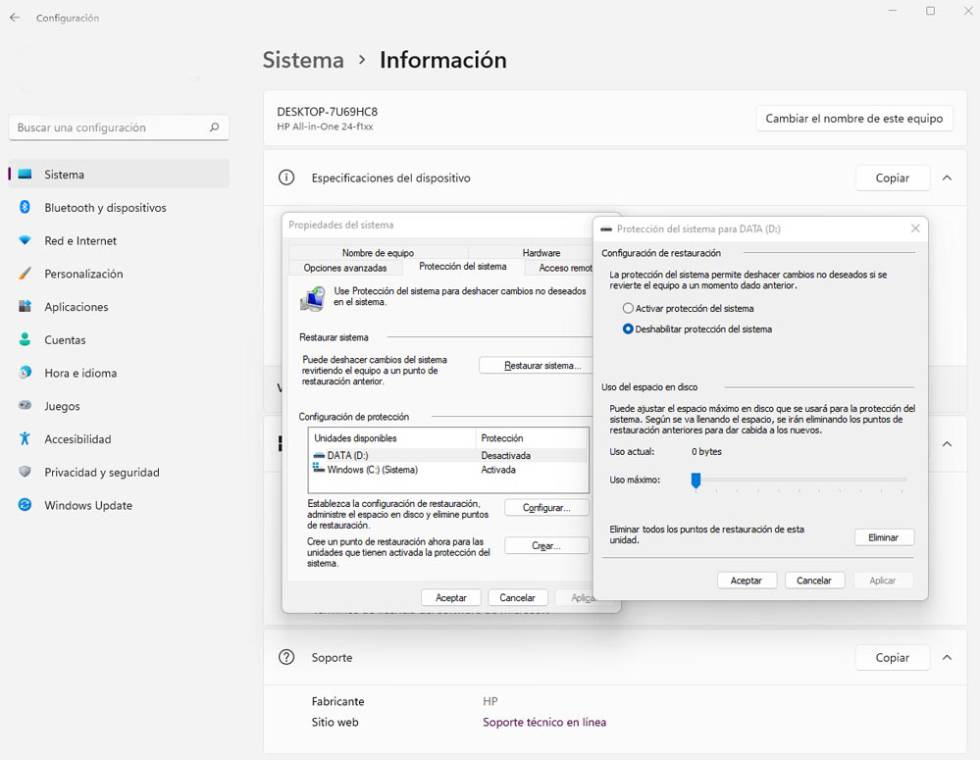
- You will now see a box called Protection Settings where you see the available options. We recommend at least having protection enabled on the disk with Windows 11 (if you have spare storage, do it with all). To do this, select the item without this feature and click the Configure button.
- In the new window you will see, simply select Enable system protection (the slider at the bottom shows the space to use, but it is recommended to leave everything as is). You’ll even find that you have a button that lets you manually delete restore points you’ve created before if you need them.
- Now click OK and you’ve done that, you’re done.
Source: Cincodias Elpais

: Everything we know a week after its release")


