


When it comes to recording the computer screen, there are various possibilities and tools.
There are so many application options that it can be difficult to determine which models perform best among users. That’s why we’ve put together a full review of the three most popular screen recorders today.
If you want to use the best screen recording apps, you’ve probably heard of one of these programs. In this article, we have collected the most popular screen recorders of the moment and tips on how to use them.
Based on our research with users of such tools, we noticed that the 3 most popular screen recorders at the moment are: Filmora, OBS Studio and QuickTime.
Then, learn more about the features, advantages and disadvantages of each of these software.
1. Movies
Wondershare Filmora is one of the most popular screen recorders on the market. Developed to combine convenience and quality, this software can be used by any user. Whether you’re working with video recording or using a screen recorder for the first time.
The program also has various and differentiated features such as motion tracking, movie stock, silence detection or mute.
In addition to these special functions, you can also find basic video editing and filtering solutions.
Benefits
- Windows and Mac compatible.
- Variety of features with advanced and simple functions.
- Countless video, image and sound effects and filters.
- It does not slow down the PC during use.
Disadvantages
- Contains watermark in free version.
2. OBS Studio
OBS Studio or Open Broadcaster Software is also one of the most popular screen recorders right now. Its popularity is due to its tremendous performance compared to similar programs, especially since there are no limitations on its resources.
This software is 100% free and compatible with host operating systems: Windows, Mac and Linux.
OBS Studio has become one of the most popular screen recorders for its high quality as well as its practicality. If you are looking for a free and efficient program, this is the best choice.
Benefits
- It’s completely free.
- There are no watermarks on the videos.
- It does not present functionality limitations to users.
Disadvantages
- Slow startup on some computers.
3. Fast Time
One of the most popular screen recorders, QuickTime combines essential features with ease of use.
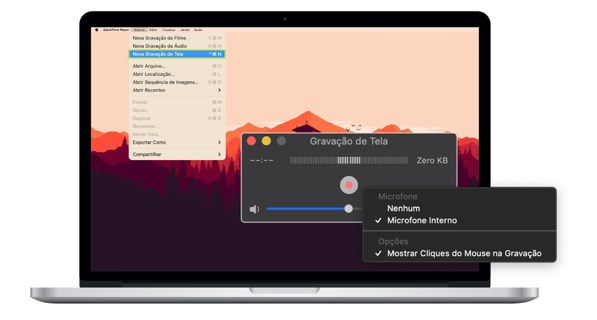
Despite being an app only available for macOS users, this software manages to combine a simple interface with a variety of functions. In other words, it is possible to record, edit, play and share videos on the platform.
Another attraction of QuickTime is that it is a completely free program with no resource limitations. Nor does it show any watermarks when exporting or sharing your videos to other viewing platforms.
Benefits
- It’s completely free.
- Available for other Apple devices.
- Without the presence of watermark.
Disadvantages
- Mac compatible only.
How to Record Videos and Audios on PC with Filmora
Filmora, one of today’s most popular screen recorders and the best for dozens of users, did not fail to offer practicality.
In fact, we’ve chosen to offer a Filmora guide for screen recording just because it’s so popular. In this way, it is possible to record video and audio to PC with the program in just three simple steps.
But first, make sure that Filmora video editor is downloaded and installed on your computer.
- Step 1: open the program and choose the recording method.
With Filmora already open on PC, the first step is to select the recording format in the start menu.
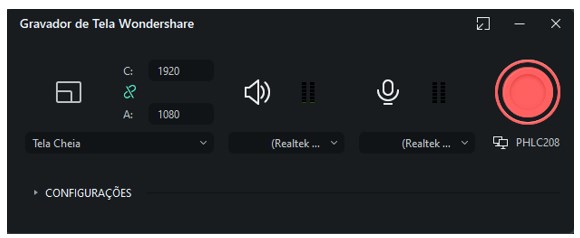
For this, select the full feature mode and click on the “record PC screen” option. Before you start screen recording, you need to configure the broadcast settings and choose your preferred model.
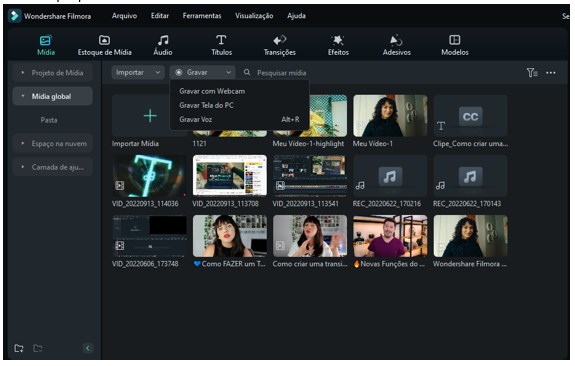
The program offers three recording models:
- Fullscreen.
- Private Window.
- Destination Window.
If you need to use your computer’s microphone or audio, enable this option before you start recording.
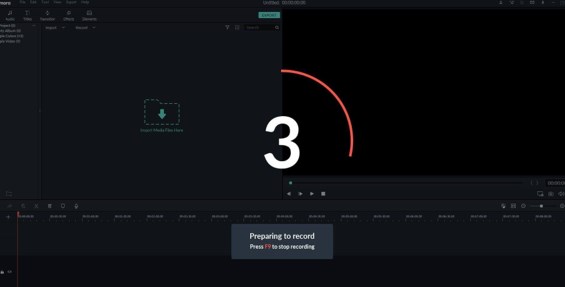
- Step 2: Start recording.
The second step is to start the screen recording process.
After creating the video settings, just click the red “REC” button to start recording. During screen recording, you can pause/start the process at any time.
When you want to stop recording, click the “REC” button again.
Tip: You can use “F9” key to start recording or create your own shortcut in settings.
- Step 3: Save your media files.
When you finish recording your PC screen, Filmora will automatically save your file and open it in the video editor.
If you wish, now is the time to edit the recording before exporting it to other platforms. You can also rely on video editing tips available directly in the editor.
End! After editing, you can use your media file as you wish.
Also, an interesting tip is that if you need to fix or remove some audio from your recording, Filmora has the ability to extract the audio from the video.
This gives more freedom to the user who can change all the audio tracks according to their preferences while recording without worrying about the issue.
What’s new in Filmora 12
Filmora has gained popularity as it has a wide variety of new video features. More than an editor and a screen recorder, the program has some extra features worth checking out, especially the effects packs.

First, there is Filmstock, which can be connected for free through your Filmora account. This feature is an extensive library of video effects, essential when editing any media file.
There you will find over a thousand music, sounds, pictures, items and graphics to use.
Also for video effects, the platform has a partnership with NewBlue FX and Boris Continuum. Both features are available for purchase through plugins that offer professional quality preset video effects and filters.
NewBlue FX is getting more attention with features like Titler Pro 7 by creating creative titles. Featured with Boris Continuum is Luzes Continuum, which guarantees 21 lighting effects.
With Filmora 12’s unique artificial intelligence, you can crop images and even reduce audio noise in a matter of minutes. Instead of going through complex manual processes to improve the raw material, the software does it for you!
4 frequently asked questions from users about screen recording
Recording the computer screen has become an increasing demand in both the professional and personal world.
Is it possible to record audio and video simultaneously in Filmora?
Filmora has the ability to record audio simultaneously with screen recording.
If you need to record a narration, it is recommended to use external audio directly from the microphone. However, if you prefer, you are also allowed to use the computer’s sound system to capture audio.
Can I shoot gameplay videos with Filmora?
The program has certain features for gamers and game publishers.
Thanks to the simultaneous recording of the computer screen and the webcam, you can easily record the game.
Where can I edit video files?
If you want to edit a video after screen recording, this can be done in Filmora’s own “timeline”.
This is because the video file will automatically open in the program’s video editor when you finish recording.
If the final file is too heavy, a tip is to use UniConverter software, which can compress videos in just a few steps.
Can I remove MP4 audio with Filmora?
This powerful software has the ability to completely remove an MP4 audio or replace it with another music track. If you want, you can eliminate just one audio track and keep the others as you wish.
Another possibility is to use UniConverter resources. This program specializes in video conversion and can automatically remove any audio noise.
So you can also use this tool to remove noise and get clean video and audio files.
uncomplicated registration
Throughout this article, we have introduced the three most popular screen recorders today. Each of these programs has unique features that have advantages and disadvantages for their users.
Although Filmora is the most popular, mainly due to its various features, we recommend choosing the application that best suits your daily usage routine. So be sure to test every feature in practice.
Only in this way will you find out which is the most complete software for your recordings!
Source: Tec Mundo
: Everything we know a week after its release")


