


Discord is a must-have platform for sending messages and video chatting or streaming with friends – if you really consider yourself a gamer. One of the reasons for the popularity of this platform are the bots that can help you with all kinds of tasks, from automated tasks like greeting new members to detailing the rules or playing music on your server, among other activities.
In this guide, we will explain how to create a discord bot.You’ll be happy to know that it doesn’t take much effort, even if you’re new to programming.
Check also here how to stream on discord, what is discord And what is twitch.
Step 1: Download Node.js and set up a Discord account.
Before moving on to the guide to building a Discord bot, we suggest downloading Node.js, a free and open source JavaScript compiler that you will need to run your bot.
Obviously, you will also need a Discord account and your own server to test your bot. If you still have it, go to Discordapp.com and create it. If you already have it, log in and open the server where you want to host your bot.
You will also need a text editor such as Notepad++ on Windows to write the code.
Step 2 – Create your bot
Now you need to create an “app” in Discord for your bot. It takes a little time, but nothing complicated. The goal is to get an “Authorization Token” so that Discord will recognize your code and add the bot to their servers.
Go to discordapp.com/developers/applications/me. You must have an account open to go directly to the application list. press New applicationgive the bot a name, click the button Save Changes.
In the right menu, click Bot. In the next menu select Add a bot, below option build a bot. If you only have one app, then the one we just created should appear automatically. Otherwise, look for it in the list.
Step 3: get a token
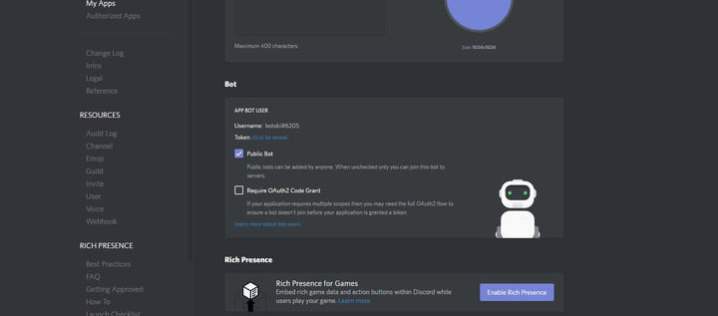
In the box marked App bot userlooking for Token: Click to reveal. Click the link and a text string will appear. This is your bot’s authorization token that allows you to submit a code. Don’t share it with anyone: whoever has it will be able to create, modify and control your bot. If you think a token is at risk, you can easily generate another one with a link. Create a new token.
Save this number. You’ll need it in step 6 of this guide on how to create a Discord bot.
Step 4 – Submit your bot to the server
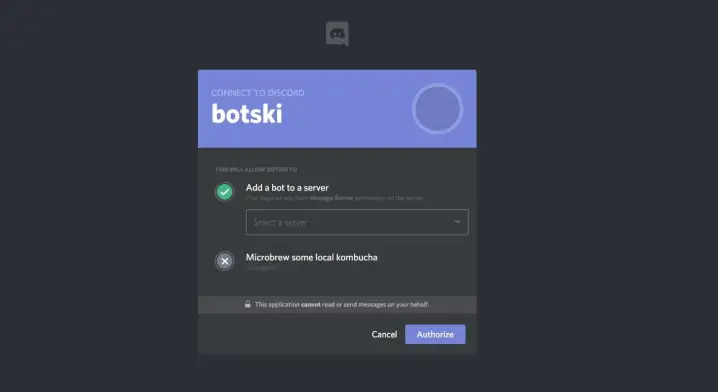
Now scroll to the marked box Application Details and look for your “Customer ID” which is a long number. Copy the number and add it to this URL, replacing the word CLIENT ID.
https://discordapp.com/oauth2/authorize?&client_id=CLIENT ID&scope=bot&permissions=8
The final url should look like this but with your id instead 22334455667788 what we are modeling:
https://discordapp.com/oauth2/authorize?&client_id=22334455667788&scope=bot&permissions=8
Copy the URL with your ID number into your browser and you will be taken to a website where you will tell Discord where to send your bot. If it worked, Discord will open in the app or browser and show you the server. The channel will report that a bot has joined the room, and you will see this in the menu on the right, below the list of online members.
Step 5 – Create a folder on your computer
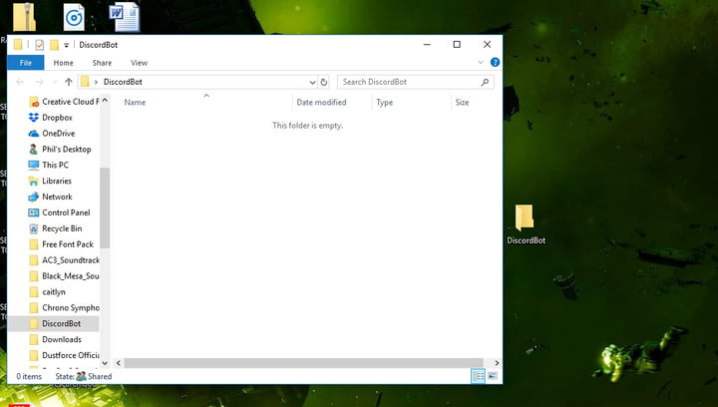
We also suggest creating an easily accessible folder on your computer to store all the bot files, something like “DiscordBot” or “MyBot” so you know exactly what it contains.
Step 6 – Create files with a text editor

You are going to create three files for your bot in a text editor. First paste this code:
{
“Token”: “Your bot’s token”
}
Replace “Your Bot Token” with the one you generated earlier. The token must be inside quotes. Save the file with a name auth.json in your team’s Discord folder. Important: do not store as .textbecause it won’t work.
Create another file with this code:
{
“name”: “greeting-bot”,
“version”: “1.0.0”,
“description”: “My first Discord bot”,
“main”: “bot.js”,
“author”: “your name”,
“dependencies”: {}
}
Replace the author’s name and change the description so you can remember what your bot does. Save this file as “package.json” in your Discord folder.
Step 7 – Define the Code
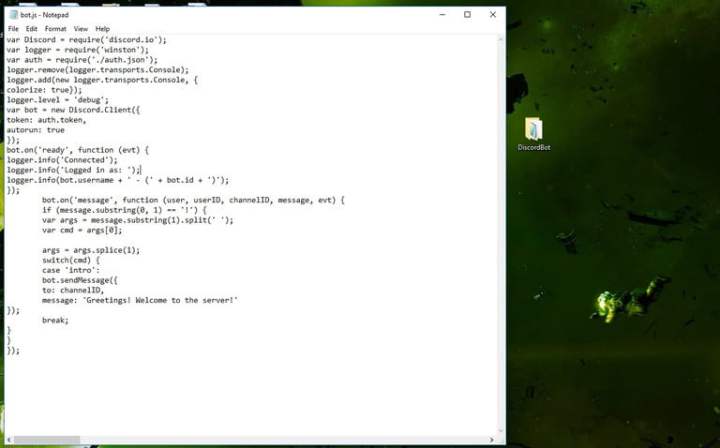
You will need a third file, vital to your bot’s behavior. You need to be familiar with JavaScript to have full control over the bot, but if you’re new to programming and just want to do something simple, you can copy and paste this code to create a simple bot that will greet your server. .
(Thanks to Medium user Renemarie Padillo, whose guidance helped us build our own.)
var Discord = require(‘discord.io’);
var logger = require(‘winston’);
var auth = require(‘./auth.json’);
// Set logger parameters
logger.remove(logger.transports.Console);
logger.add(new logger.transports.Console, {
colorize: true
});
logger.level = ‘debug’;
// Initialize Discord Bot
var bot = new Discord.Client({
token: auth.token,
autoplay: true
});
bot.on(‘done’, function (evt) {
logger.info(‘Connected’);
logger.info(‘You are logged in as:’);
logger.info(bot.username + ‘ – (‘ + bot.id + ‘)’);
});
bot.on(‘message’, function(user, userid, channel id, message, event) {
// Our bot needs to know if it will execute
// Listen for messages starting with ‘¡’
if (message.substring(0, 1) == ‘¡’) {
var args = message.substring(1).split(‘ ‘);
cmd variable = arguments[0];
args = args.splice(1);
switch (command) {
// !ping
‘ping’ case:
bot.sendMessage({
to: channel ID,
message: “Hello! Welcome to the server!
});
break;
// Add any command you want
}
}
});
This code sets up a bot that responds to certain messages. In particular, anything that starts with a “¡” character, so if someone types “Hello!” on your server, as long as the bot is online, it will respond automatically. We define our message as “Hi! Welcome to the server!” But you can change them in the above code. Just make sure the messages are enclosed in single quotes.
Save this file as “bot.js” in your Discord folder.
Step 8 – Open Command Prompt
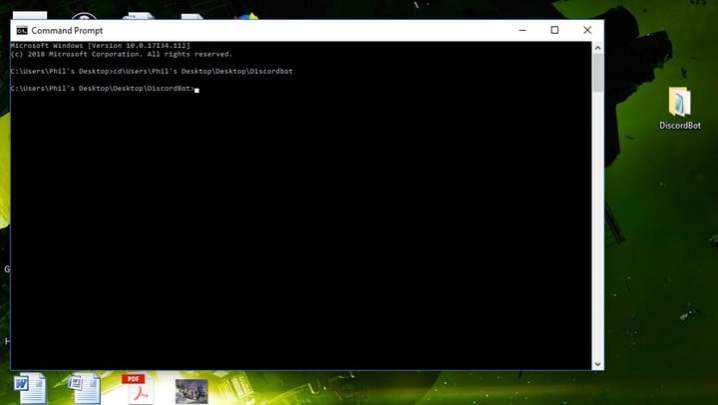
On a Windows PC, you can easily access the command prompt by clicking the Windows icon and typing “Command Prompt”. When it’s open, type “cd” followed by the path to your files folder. Where we tested, the command looks like this:cd UsersPhil’s DesktopDesktopDiscordBot“.
You can also go to your folder in Windows and hold down the key shiftwhile right-clicking in an empty area of the folder and selecting open command window here.
Step 9. Use the command line to install bot plugins.
It’s time to use Node.js. At the command prompt, with the Discord folder in the path, type “npm install discord.io winston – save“. This will automatically install the files needed for your Discord bot into a folder.
Also use the following command line to install additional plugins: npm installation https://github.com/woor/discord.io/tarball/gateway_v6
This should give you all the files you need.
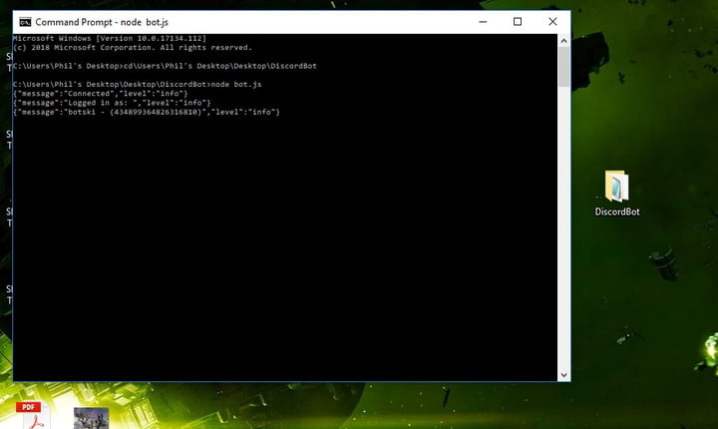
Step 10 – Launch the Bot

It should be like this. To run the bot, type “node bot.js” at the command prompt (make sure you’re still in your Discord folder).
Now go back to the Discord server and test your bot by typing “Hello!” or “”. If everything went well, your bot should immediately return the message you encoded.
Congratulations, you now know how to create a Discord bot!
Step 11: Find out if your bot was created by someone else
Discord has a community that shares things for the benefit of everyone, including bots. There are entire databases of programs created by other users and performing a variety of functions. Often the creators make them available for download and use by everyone.
You can save time and money on coding by visiting some of the common sites where Discord bots are available to see if someone has already done the work you need. Some useful places to look for Discord bots are Top.gg (formerly Discordbots) and Bots.ondiscord.xyz (formerly bots.discord.pw).
Source: Digital Trends
I am Garth Carter and I work at Gadget Onus. I have specialized in writing for the Hot News section, focusing on topics that are trending and highly relevant to readers. My passion is to present news stories accurately, in an engaging manner that captures the attention of my audience.

: Everything we know a week after its release")


