


Artificial intelligence is increasingly involved in our daily lives. Be it the famous GPT Chat, which automates a number of daily tasks, or other popular applications that now have these features.
And in between Adobe Photoshop, has recently gained a number of functions using artificial intelligence. Among these, it is now possible to remove objects from the image in a few steps and even expand the photo with the automatic enlargement feature.
And to help you with this and other resources, today TecMundo teaches you: How to use Photoshop AI? Check this out!
How to use Photoshop AI?
As mentioned before, AI sources are tools that use artificial intelligence to make changes to images. they are available Free for Adobe Photoshop plan subscribers and unlike other applications, it has no usage limitations, so you can make as many changes as you want.
Check out the main AI tools and how to use them:
How to remove background from images?
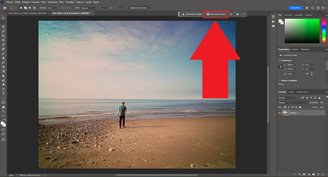
1. Open the image in Photoshop;
2. Then click on “Remove Background” option as shown in the image below. It is important to note that this options bar can be moved, so its location is different for each user;
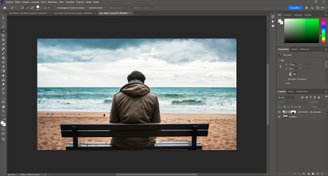
3. Notice that the image has been removed and only the main objects remain in it; in our example this is a man on the beach deleted;

4. That’s it, now edit or save the image with the background removed.
How to change image background?
1. After opening the file you want, click on the “Quick Selection Tool” option on the left side of the screen as shown in the image below;
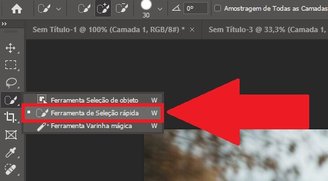
2. Then use the tool to select the entire background to be replaced in the image;

3. Then type the background to be added in the AI bar as in the example below;

4. That’s it, now the background will automatically change to the one you sent in the instructions to the AI.
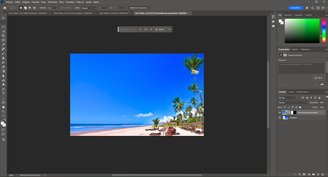
How to enlarge photos using Photoshop AI?
1. Open the image file you want to enlarge;
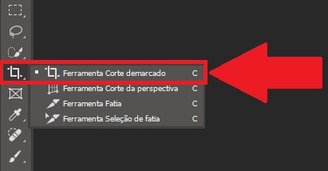
2. Then click on the “Outline Cutting Tool” option located on the left side of the screen in the Toolbar;
3. Now pull the image sideways to create the area that is enlarged and filled later;
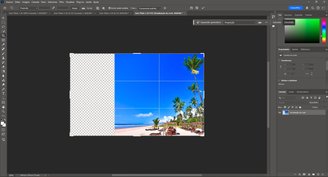
4. Then click on “Manufacturer fill”;

5. Then click the “Create” button;

6. Notice that the empty space is filled with AI-generated content that is extremely faithful to the photo;
7. Ok, now repeat the process as many times as you want.
Did you like the content? Keep an eye on TecMundo and keep up to date with its many other tutorials (for example, information on how to recover deleted messages on WhatsApp).
Source: Tec Mundo
I am a passionate and hardworking journalist with an eye for detail. I specialize in the field of news reporting, and have been writing for Gadget Onus, a renowned online news site, since 2019. As the author of their Hot News section, I’m proud to be at the forefront of today’s headlines and current affairs.
: Everything we know a week after its release")


