


This Windows 11 recycle bin It is the most useful option as it prevents important information from being lost many times and accidentally deleted from the computer. But sometimes, you don’t want something to pass through because it is important that he disappears from the team as soon as possible. We will tell you how to get it.
This is a possibility that Microsoft is considering for some versions of the operating system for computers, and is valid in Windows 11. Therefore, if you perform the actions that we will indicate, you will be able to. permanently delete any file (image or text document) without taking up space in the recycle bin – and by extension, on the computer. And this can be very important to many.
Delete files in Windows 11 without using the Recycle Bin
The easiest way to achieve what we’ve said is to use a key combination that is effective, whether you want to delete a single file or just want to get rid of a bunch of files. Here’s what you need to do (and be clear that there’s no going back from what you’ve done):
- Select the target file you want to remove from your Windows 11 computer.
- Now you have to press both the Shift and Delete keys together. By doing this, the use of the recycle bin is bypassed and you delete everything, for example, as if you were using old MS-DOS.
- You are done and of course you can repeat the process as many times as you see fit.
Maybe a second option you like more
In Windows 11, there is the possibility: disable recycle bin, this means that everything you delete does not go through and is permanently deleted directly. The risk of running into trouble in the event of an error increases significantly, but the truth is that for many, this is an excellent way to save both computer space and time. Here are the steps you should take:
- Find the recycle bin icon on the desktop, it’s usually in the top left.
- Now right-click there and choose Properties from the context menu that appears.
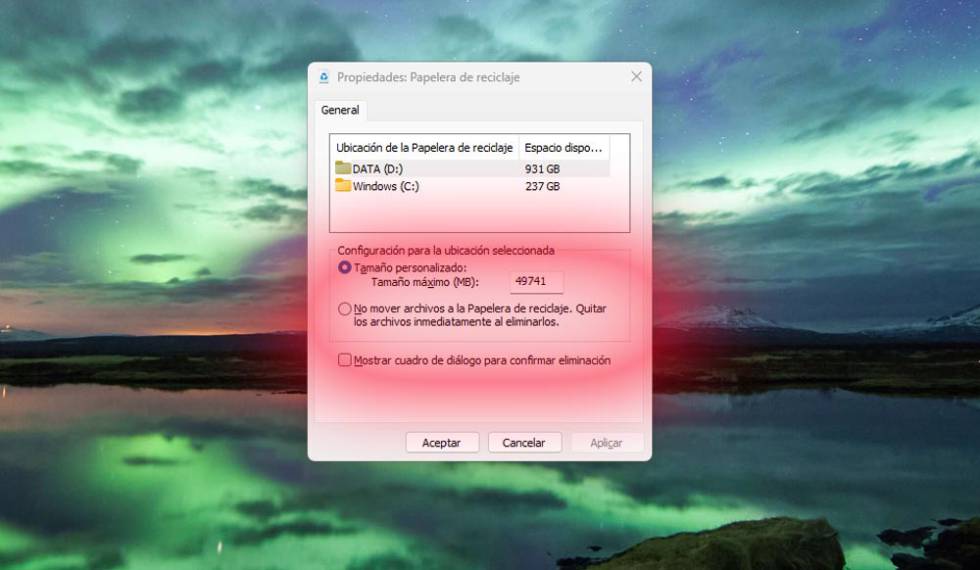
- You will see a new window pop up in the middle area with an option called Move files to Recycle Bin. Remove files immediately after deletion. Click there and then the OK button.
- Done, you’re done.
Source: Cincodias Elpais
I’m a professional news writer with an eye for detail and the ability to quickly turn complex topics into engaging stories. With over 5 years of experience in the industry, I’ve built up a wealth of knowledge on what makes headlines click. As an author at Gadget Onus, I specialize in covering hot news stories which keeps me up to date with all the latest trends and developments.


: Everything we know a week after its release")


