

")


Today Apple launched a new service, a specialist taught how to independently check an iPhone.
We tell you how to use it and what you can test.
Which iPhone is suitable?
You can test all models starting with the iPhone 12. This iPhone must have iOS 17 or a later version of the built-in system installed. A connection to a public Wi-Fi network is required; cellular data does not work in diagnostic mode.
To carry out diagnostics, you will also need a second device. This could be a Mac, iPad or iPhone. They must have iOS 13, iPadOS 13, macOS Catalina 10.15 or later software installed.
It is possible to use a Windows PC. Sometimes you need to use Chrome 55 or later, Firefox 59 or later, or Microsoft Edge 12 or later.
What can be diagnosed
• Mobile Resource Inspector (MRI)
This diagnostic package is an initial assessment that first presents the device’s software version and the presence of hardware components.
• Dead pixels on the display
This set displays a range of colors and patterns that show pixel anomalies and various debris.
• Multi-touch
This set helps identify areas of the display that have working touch pixels.
• Camera Image Quality
This set helps to identify problems with the operation of the main and front cameras.
• Face ID
This package is designed to test Face ID sensors.
• Audio cable
This set plays a range of chord tones through the speakers and offers to ensure that the tones played through the speakers are audible and not distorted. For best results, it is recommended to run the test in a quiet manner.
Prepare your iPhone for diagnostics
1. Update your iPhone to the latest version of iOS
2. Turn off this iPhone
3. Disable all accessories from iPhone
Run Apple Diagnostics on the second device.
1. On the second device via this link
2. Click Continue See the Apple Diagnostics page for DIY repairs.
Select iPhone
How to enable diagnostic mode on iPhone
1. Turn off iPhone:
To do this, press and hold the Side button and any light control button simultaneously until the sliders appear, then drag the Turn Off slider. Wait 30 seconds until the device turns off.
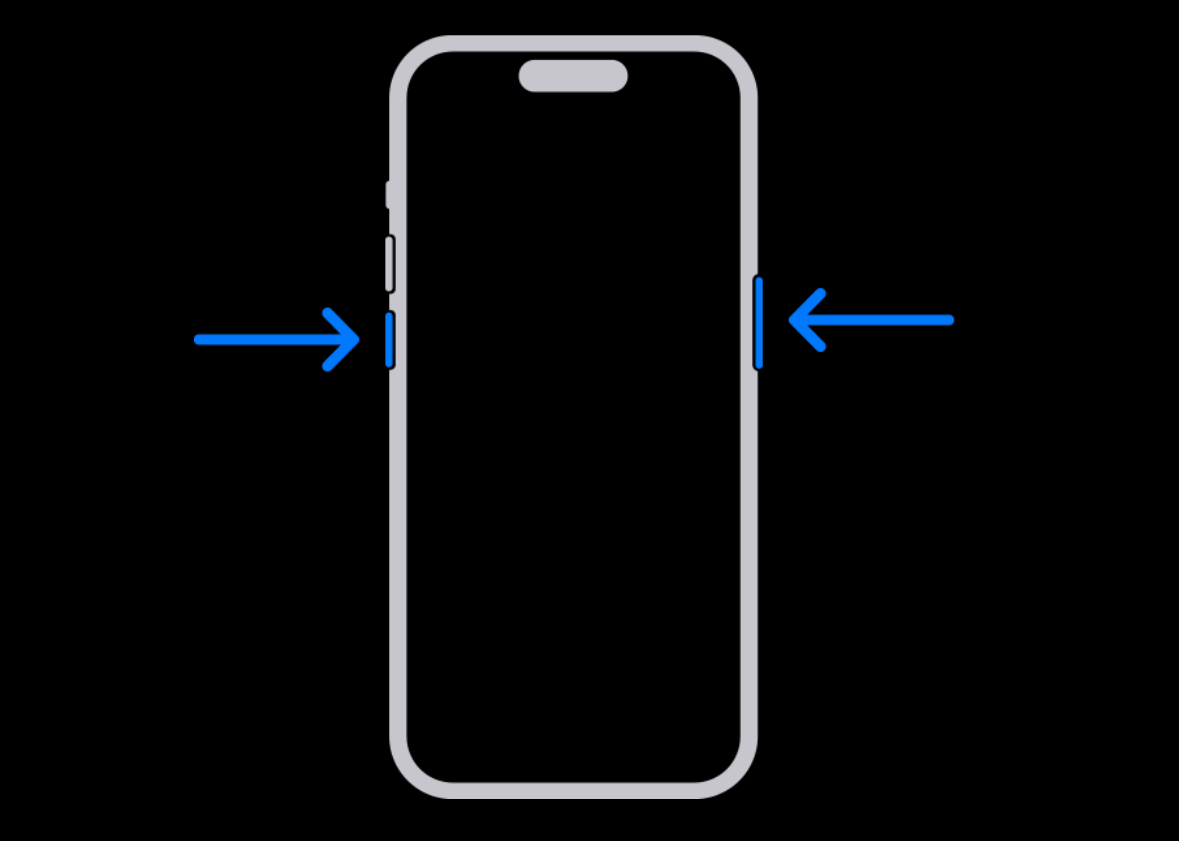
2. Press and hold the increase button and main sound.

3. While holding down the buttons, connect iPhone to a 20W or higher power adapter, or directly to a computer that is turned on and plugged into an outlet. No hubs, displays or other similar connections are required.
4. When the Apple logo appears, release the button.
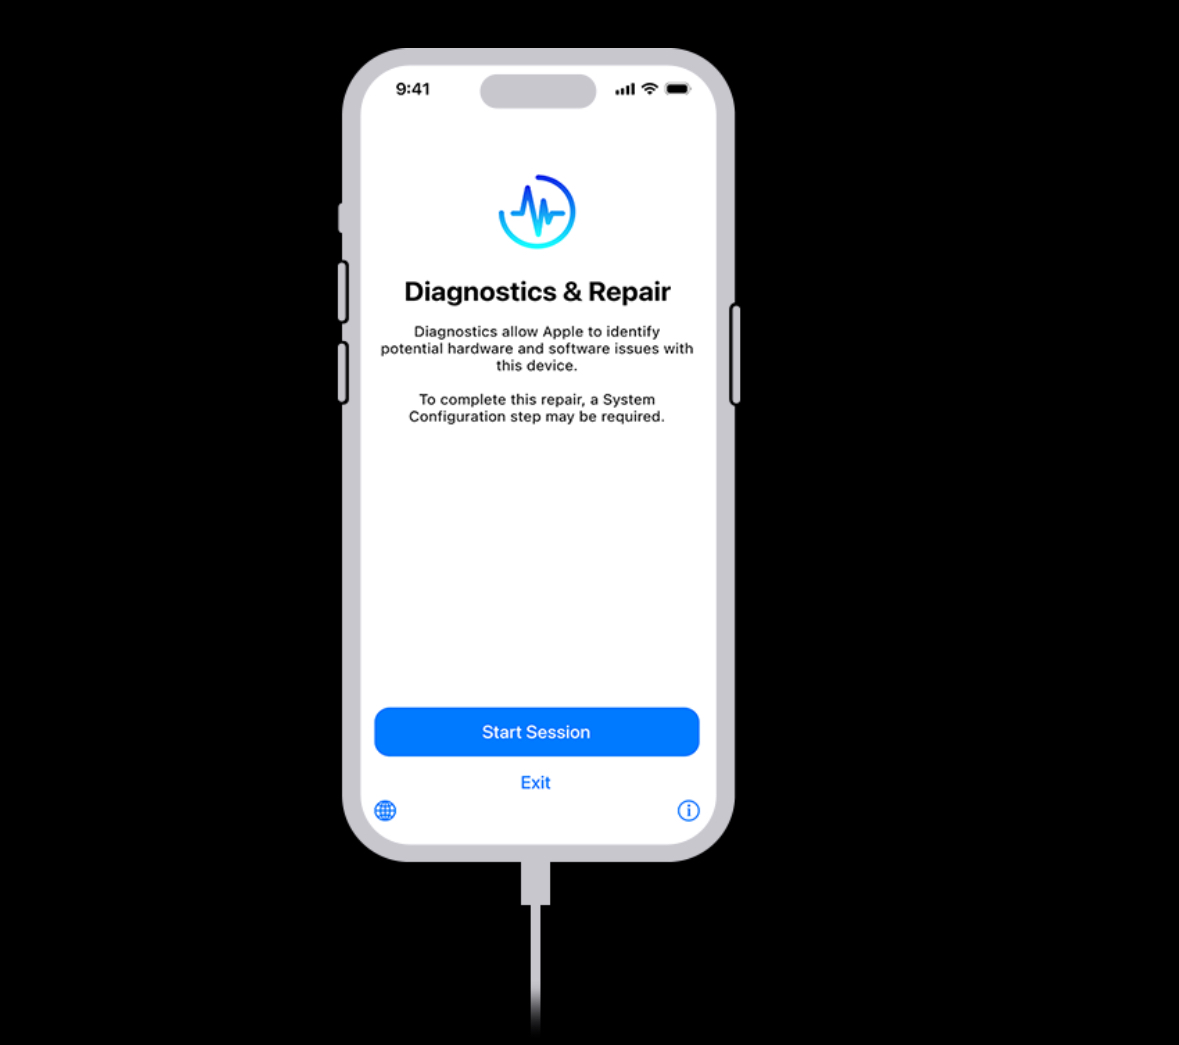
When you see the message “Diagnostics allows Apple to identify potential hardware and software problems with this device,” it means your iPhone has entered diagnostic mode.
Log in and disconnect from the diagnostic session
1. On the Apple Diagnostics page for DIY repair of a second device, enter the serial number of the iPhone you want to diagnose
2. On the second device, press Start a session. If your iPhone doesn’t enroll in the diagnostic session, click To try one more time
3. On the iPhone you’re testing, press Starting a session diagnosis on the screen
4. After successfully registering your iPhone, select a set of diagnostic tests.
That’s all. Now you can choose any diagnostic option from the ones presented above.
Source: Iphones RU
I am a professional journalist and content creator with extensive experience writing for news websites. I currently work as an author at Gadget Onus, where I specialize in covering hot news topics. My written pieces have been published on some of the biggest media outlets around the world, including The Guardian and BBC News.
: Everything we know a week after its release")


