


The processor of a device has a core-based architecture. divides these tasks and thus Does not overload hardware when running software and other heavy computer tasks.
Windows does not enable all of these cores by default when running the system. However, it is possible to do the procedure manually and thus get more use out of the CPU on a daily basis.
And to help you with that, today TecMundo is teaching you how to enable all processor cores. Check it out!
How do I check how many cores my processor has?
1. Press “CTRL + ALT + DEL” in any section of Windows;
2. On the screen that opens, click on the “Task Manager” option;
3. Then click on the “Performance” tab;
4. Then click on “CPU”;
5. Now check the box with processor information at the bottom of the screen as shown in the image below;
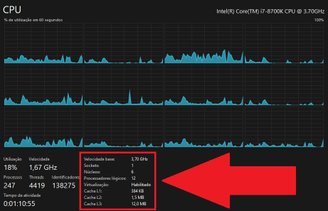
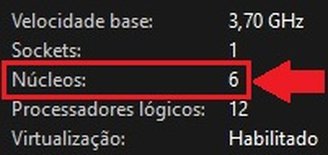
6. Once you’re there, look for the “Cores” information. The number next to it represents the amount your processor has.
To enable all processor cores step by step
1. Press “Windows” + R to open the “Run” menu;
2. Once there, type “msconfig” and click “OK”;

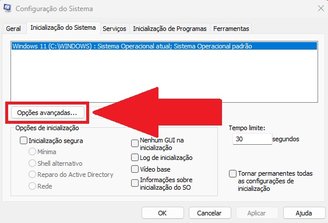
3. On the “System Configuration” screen, click the “System Startup” tab;

4. Then click on the “Advanced options” button as shown in the picture below;
5. Now first check the option “Number of processors”. Then select the highest number from the list to enable all processor cores;
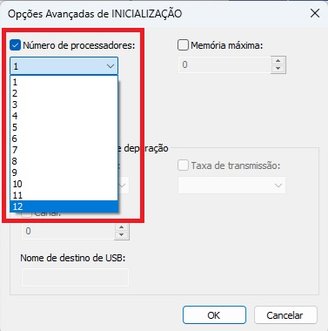
6. Then click “OK” and click “Apply” in the previous window;
7. Finally, a window will appear asking whether you want to restart your computer now or later to enable the option.

Did you like the content? Repost it on your social networks and tell your followers about this tutorial. Take the opportunity to stay up to date on what overclocking your computer is all about. Until next time!
Source: Tec Mundo
I am a passionate and hardworking journalist with an eye for detail. I specialize in the field of news reporting, and have been writing for Gadget Onus, a renowned online news site, since 2019. As the author of their Hot News section, I’m proud to be at the forefront of today’s headlines and current affairs.

: Everything we know a week after its release")


