


How to install new versions of macOS on old, unsupported Macs?
It is possible to have an updated version of macOS on an older Mac. This procedure is performed thanks to the OpenCore Legacy Patcher tool
It is known that every WWDC brings compatibility expectations high when new operating systems are released, making old Mac owners nervous. A list will be released at the end of the main event to find out which Macs are compatible with the next and latest version of macOS. The good news is It’s still possible to run a new version of macOS on older Macs using the OpenCore platform. It was also used to make Hackintosh possible; Unfortunately this is going away considering the level of modernity they manage in Cupertino. OpenCore is an open repository on GitHub page.
What is OpenCore? Is it safe to install?
This is what is known as a bootloader that loads and modifies boot blocks on the storage device to allow other operating systems to boot. The process seems simple, but it is not. a piece of code is loaded onto the disk of the corresponding computer with one or more operating systems. The direct advantage is running new versions of macOS on older computers that are not fully compatible or on an older computer.
Like, OpenCore is not supported and is therefore under development. This is not a definitive tool and may be unstable enough to cause information to be deleted. The best thing to do before starting the installation process is to Back up your Mac. If you have an old Mac or want to breathe life into a Mac you no longer use because it has an outdated version, it’s a matter of making a bold decision.
This is the first procedure to get started, are you ready?
For this tutorial we will install macOS Sonoma on an old Mac. This is a complex process and maybe there may be other guides as well, so we will recommend the best here so you don’t fail in this attempt. We will need to download OpenCore Legacy Patcher developed by Dortania. This installer will allow us to install and run the latest versions of macOS on Intel-based Macs from 2008.
To have all the necessary and correct drivers, it is necessary to create a custom installer.in addition to the code for the generated hardware. The process is to patch and build the installer with the included changes. This way, when the final installation process is executed, our team will know how to install it without any problems.
You should be aware of the minimum specifications required by the equipment to run the new operating system correctly. At least 8 GB of RAM is recommended, with some versions such as Ventura and Sonoma requesting this, though not up to 16 GB. Once the vehicle is unloaded, we will begin the procedure. If you’re not sure about following this procedure, here are 7 tips and tricks to speed up your old Mac.
Download all required elements
We will need old Mac and external USB stick of 16 GB or more. This unit is for creating the macOS installer. Download the installer from this page; It is found at the end of the GitHub post under the names “AutoPkg-Assets.pkg” and “OpenCore-Patcher-GUI.app-zip”.
Unzip downloaded resources. Don’t forget the copy of the installer for the version of macOS you want to install. Note that this copy must be in the Applications folder for OpenCore Legacy Patcher to find it.
Build the installer with OpenCore Legacy Patcher
- After opening the software, Run OpenCore Legacy Patcher

OpenCore Legacy Patcher Main Menu
- click “Create macOS Installer”
- Later “Use Existing macOS Installer” (Note that you already have a copy of the macOS version in Apps)

Use existing macOS installer
- When we run the software from the Mac on which we will install the refreshed macOS, we will be told whether the Mac is compatible with the selected installer. This can also be done on a modern Mac, but You need to be careful about letting the software know which Mac model it will ultimately be installed on.in the Host Model option at the top.
- Connect the 16GB USB drive to your Mac (note that all data on the drive will be deleted to create the patched installer)
- Select the macOS Sonoma installer (or your choice)

Select the USB drive to create the OCLP installer
- Then select the USB drive to install
- It will start the installation process immediately

USB installer created
Here we finish creating the macOS installer. Then we must return to the beginning and click on “Building and Installing OpenCore”.. Note that OpenCore builds are hardware specific; If you are not compiling on the Mac on which you will install the operating system, do not forget to select the target Mac model in the settings. Click the “Build and Install OpenCore” button to get started.

Install OpenCore Legacy Patcher
After completion of construction, the software will notify you of a new “Load to disk” button. Select the drive and volume to install OpenCore. We are now ready to install modern macOS on the desired Mac.

Compiling and installing OCLP
Install macOS with OpenCore
We have now completed about 70 percent. Now we move on to the next page of the “Starting OpenCore and macOS” instructions You need to click on it. Make sure the USB drive is connected to the Mac where the new version of macOS will be installed, restart your Mac and hold down the Option key. You will start with the EFI boot menu.

EFI menu to install new version of macOS
- Select EFI Boot with the OpenCore icon in the up arrow
- you will see You will need to select OpenCore Selector and Install macOS Sonoma (or previously selected version)
- The process will start immediately
Let’s boot up macOS like new
- Once macOS is installed we will reboot to start with the new system
- We will run the OpenCore Legacy Patcher and go to the final instructions page called “Post-Installation Root Patch”.
It is important to complete the following actions: Boot smoothly without a USB drive, without Boot Selector, and apply volume patches. Follow the instructions on the post-installation page to boot without a USB drive. In short, you need to run the software, change the settings, recompile OpenCore and install it on the internal drive. To finish, you need to reboot and start with the Option key. You will now need to select the newly patched macOS from the internal drive.
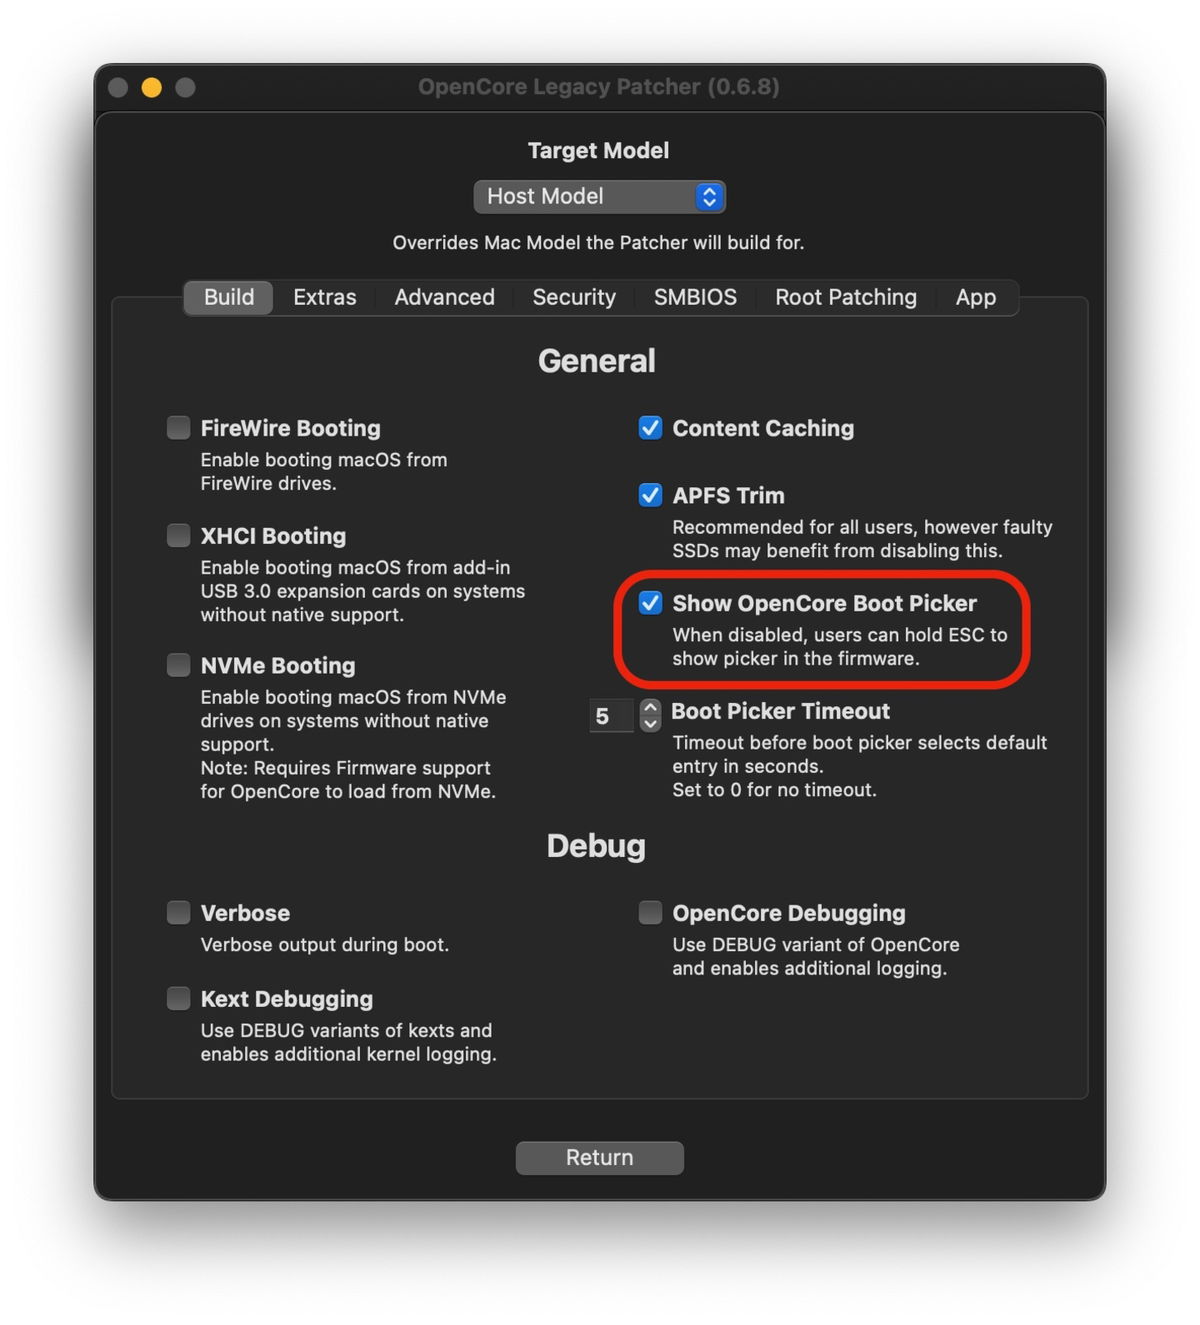
Final OCLP settings
To avoid problems without Boot Picker, you should run the software and go to settings and disable the “Show OpenCore Bootpicker” option. You will need to rebuild OpenCore once again and display the selector by holding ESC while clicking on the EFI boot volume.
The final detail of patches will be required if the USB drive was not created from software.
Consider these considerations to finalize and verify your installation
Of course, this setup was very complicated and you had to re-read it several times to get it right.. Consider this tutorial from a well-known Action Retro (we saw how it modernized the iMac G4): Explain the process we did here in 15 minutes..
You are likely to experience some problems after installing macOS Sonoma 14.1, in addition to the errors presented, there are also problems with OpenCore Legacy Patcher 1.1.
Don’t forget the OpenCore installation guide, which goes into more detail about the technical knowledge aspect and how booting works on different older Macs. This tutorial was made possible thanks to information from AppleInsider’s Chip Loder.
Source: i Padizate

")

: Everything we know a week after its release")


