Dropbox is known as a service for securing your files in the cloud, but more and more additional functions are being added all the time. One of them is Dropbox Capture, which lets you record your screen. Here we explain how this works.
The cloud service comes with the ability to take screenshots and screenshots that it saves directly to the cloud: Dropbox Capture. This way, you can use screenshots and video messages to put together presentations and tutorials. Of course, you must have a Dropbox account first. Next, visit the Dropbox Capture website to download the desktop application installer.
The software is available for Windows and macOS. Dropbox would like to point out that this is a beta version. So there are still some unfinished points, for example Capture only works in English.

three options
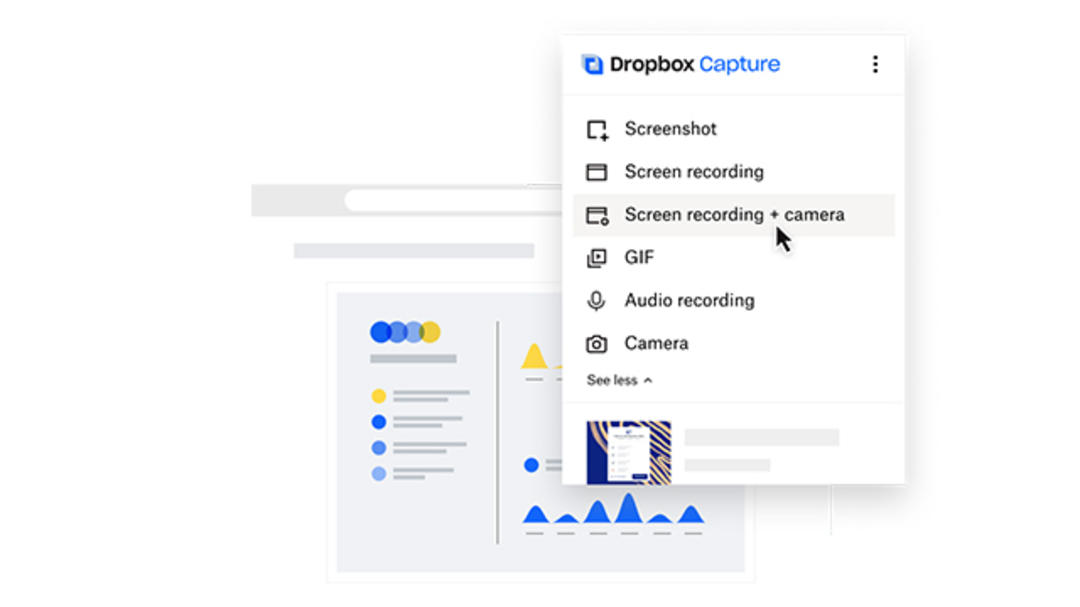
After installation, open the new application in Windows from the Windows system tray. On macOS the icon is in the top right main menu. When the app opens, it asks if it can connect to your Dropbox account. Then you get three options.
You can take a screenshot, screen recording or a screen recording with the camera also framing you. Beneath these three buttons is a small video explaining the possibilities of the new app. In the top right you will see an icon that when clicked opens the Capture in Dropbox folder.
Screenshot and Screen Recording
Going for the first option? Screenshot, then you can capture the entire screen with a mouse click. With the spacebar pressed, you print an active window and drag to take a photo of a specific area of the desktop.
if you Screen Recording or Screen Recording + camera select it, the app will ask for your permission to use the webcam and microphone. On macOS, you go to: System Preferences† Then you need to close the app and open it again.
To capture what’s on screen in a movie, first drag over the region you want to capture, then use the red record button.

preferences
The webcam function did not work for us at first. In the bottom corner of the screenshot, only the profile picture that we use by default in Dropbox appeared. On closer inspection, this was because the correct webcam was not selected in the program’s preferences.
Click the three dots in the upper right corner of Dropbox Capture and preferences† In the preferences you can specify with a key that the application should start with the system. Here you can choose the right camera and microphone and specify the quality you want. There is also a tab Shortcuts Where you bind this app’s three recording options to keyboard shortcuts.
Copy the image or link
In a screen recording, the program counts down three-two-one after you press the start button. That way, you’ll be prepared when you get into the picture. It is possible to take notes on the screen while recording, and you can also pause it. Videos come as mp4 files. capturefile.
Screenshots are saved as a PNG file. In the preferences you can also specify whether images you create are automatically kept in the clipboard so you can paste them into a document immediately.
In addition, you can always put links of pictures or videos on the clipboard. This makes it easy to share these files with people who don’t have Dropbox, for example, via email.

gifs and more
When you press the button, the Capture window expands. Show more clicks You can reach the button later. GIF to create gif animations of the selected screen area. This selection provides you with a silent screen movie. under GIFBy pressing the button you will find two more options: the option to record audio and a button to speak only through the webcam.
Thumbnails of recent recordings appear at the bottom of the panel. When you hover over such a thumbnail, four buttons appear. You can view the recording and it will open on a web page. Or you will get the link. You can also download or delete the recording.
Source: Computer Totaal


