
")


Google Maps is one of the main navigation apps. Much of its popularity is due to the variety of functions the app has, such as seeing traffic in real time, looking at streets in 3D format through Google Street View, and even planning trips.
It is possible in create an itinerary with a range of optionsLike places to visit, you can even draw a route with travel time and distance between highlighted points. And best of all, you can even share it with your friends and other interested people.
And today TecMundo teaches you how to use Google Maps to create a travel itinerary. Check it out!
Step-by-step guide to using Google Maps to plan your trip
1. Access the Google My Maps website to create a new map;
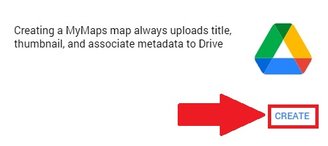
2. Once you get there, click on “Create new map”;
3. Then click “Create” in the warning that appears on the screen;
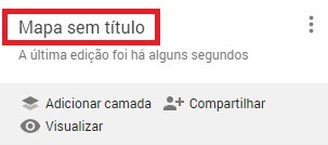
4. Now, on the home page of Google Maps, click on the “Untitled map” option to give a name to what will be created;
5. With the map open, enter the location (city, neighborhood, etc.) where the trip will take place.
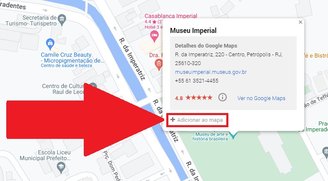
6. Then search and add places to include in your trip. To do this, click on them and press “Add to map” as shown in the image below;
7. Once added to your map, the location shows some options. Click on the first one to change its color and thus differentiate it in your trip list;

8. In the second option, you can edit the title to create a reference to find it more easily in your travel list;

9. In the fourth icon you can create a route to this point of the journey. In it you can travel between another point to be visited before, for example, thus calculating the time and distance;

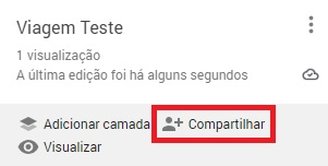
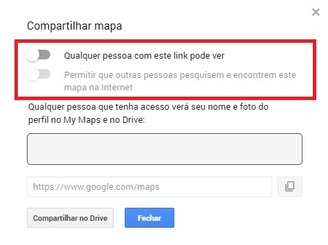
10. After adding all the points, you can share your trip with the marked destinations. To do this, first click “Share”;
11. Now you can choose who will receive the link for your trip or select this option. other people see your map and can use it as a kind of guide. To do this, simply toggle the desired options;
12. Ok, now enjoy your trip with all your desired destinations outlined.
Did you like the content? Repost it on your social networks and let your followers know about this tutorial. Take advantage of the opportunity to read how to avoid toll booths and ferries using Google Maps. Until next time!
Source: Tec Mundo
I am a passionate and hardworking journalist with an eye for detail. I specialize in the field of news reporting, and have been writing for Gadget Onus, a renowned online news site, since 2019. As the author of their Hot News section, I’m proud to be at the forefront of today’s headlines and current affairs.

: Everything we know a week after its release")


